
TL,DR;
Once installed on a device, each Android application lives in its own security sandbox:
- The Android operating system is a multi-user Linux system in which each application is a different user.
- By default, the system assigns each application a unique Linux user ID (the ID is used only by the system and is unknown to the application). The system sets permissions for all the files in an application so that only the user ID assigned to that application can access them.
- Each process has its own virtual machine (VM), so an application’s code runs in isolation from other applications.每个进程都有自己的虚拟机,应用运行彼此隔离。
- By default, every application runs in its own Linux process. Android starts the process when any of the application’s components need to be executed, then shuts down the process when it’s no longer needed or when the system must recover memory for other applications.每个应用默认运行在自己的Linux进程中,当应用中的组建被激活时进程启动,当需要为其他应用恢复内存时杀死进程。
There are ways for an application to share data with other applications and for an application to access system services:
- It’s possible to arrange for two applications to share the same Linux user ID, in which case they are able to access each other’s files. To conserve system resources, applications with the same user ID can also arrange to run in the same Linux process and share the same VM (the applications must also be signed with the same certificate).通过sharedUid方式来共享数据。
- An application can request permission to access device data such as the user’s contacts, SMS messages, the mountable storage (SD card), camera, Bluetooth, and more. All application permissions must be granted by the user at install time.应用可以通过申请权限来访问其他应用的数据。
There are four different types of application components. Each type serves a distinct purpose and has a distinct lifecycle that defines how the component is created and destroyed.Here are the four types of application components:
- Activities:An activity represents a single screen with a user interface.An activity is implemented as a subclass of Activity.Activity是一个用户界面。
- Services:A service is a component that runs in the background to perform long-running operations or to perform work for remote processes. A service does not provide a user interface.A service is implemented as a subclass of Service.Service是在后台运行的组件,不提供用户界面。
- Content providers:A content provider manages a shared set of application data. You can store the data in the file system, an SQLite database, on the web, or any other persistent storage location your application can access. Through the content provider, other applications can query or even modify the data (if the content provider allows it).Content providers are also useful for reading and writing data that is private to your application and not shared.A content provider is implemented as a subclass of ContentProvider and must implement a standard set of APIs that enable other applications to perform transactions. 一个ContentProvider管理共享的数据,可以把数据保存在文件系统中,SQLite数据库中或者在网上或者其他你的应用程序可以访问到的用于持久化数据的位置。其他应用如果有相关权限可以通过ContentProvider来查询或者修改数据。
- Broadcast receivers:A broadcast receiver is a component that responds to system-wide broadcast announcements.Although broadcast receivers don’t display a user interface, they may create a status bar notification to alert the user when a broadcast event occurs. More commonly, though, a broadcast receiver is just a “gateway” to other components and is intended to do a very minimal amount of work. For instance, it might initiate a service to perform some work based on the event.A broadcast receiver is implemented as a subclass of
BroadcastReceiverand each broadcast is delivered as anIntentobject.一个Broadcast receiver会对系统范围内的广播进行响应。Broadcast receiver不会显示用户界面,但可以创建一个状态栏通知来告诉发生了广播事件。
When the system starts a component, it starts the process for that application (if it’s not already running) and instantiates the classes needed for the component.系统启动一个组件时,就会启动组件所在引用的进程并实例化组件所需要的相关类。 For example, if your application starts the activity in the camera application that captures a photo, that activity runs in the process that belongs to the camera application, not in your application’s process. Therefore, unlike applications on most other systems, Android applications don’t have a single entry point (there’s no main() function, for example).
Three of the four component types—activities, services, and broadcast receivers—are activated by an asynchronous message called an intent. Intents bind individual components to each other at runtime (you can think of them as the messengers that request an action from other components), whether the component belongs to your application or another.Activity,Service,Broadcast receiver可以通过Intent来被激活。
An intent is created with an Intent object, which defines a message to activate either a specific component or a specific type of component—an intent can be either explicit or implicit, respectively.
The other component type, content provider, is not activated by intents. Rather, it is activated when targeted by a request from a ContentResolver. The content resolver handles all direct transactions with the content provider so that the component that’s performing transactions with the provider doesn’t need to and instead calls methods on the ContentResolver object. This leaves a layer of abstraction between the content provider and the component requesting information (for security).ContentProvider会在请求调用ContentResolver时来被激活。
There are separate methods for activating each type of component:
- You can start an activity (or give it something new to do) by passing an
IntenttostartActivity()orstartActivityForResult()(when you want the activity to return a result). - You can start a service (or give new instructions to an ongoing service) by passing an
IntenttostartService(). Or you can bind to the service by passing an Intent tobindService(). - You can initiate a broadcast by passing an Intent to methods like
sendBroadcast(), sendOrderedBroadcast(), or sendStickyBroadcast(). - You can perform a query to a content provider by calling
query()on aContentResolver.
Activities, services, and content providers that you include in your source but do not declare in the manifest are not visible to the system and, consequently, can never run. However, broadcast receivers can be either declared in the manifest or created dynamically in code (as BroadcastReceiver objects) and registered with the system by calling registerReceiver().
For every resource that you include in your Android project, the SDK build tools define a unique integer ID, which you can use to reference the resource from your application code or from other resources defined in XML.Android工程中的每个资源,都会被sdk build tools定义为一个唯一的id.One of the most important aspects of providing resources separate from your source code is the ability for you to provide alternative resources for different device configurations.
Activities
An application usually consists of multiple activities that are loosely bound to each other. Typically, one activity in an application is specified as the “main” activity, which is presented to the user when launching the application for the first time. Each activity can then start another activity in order to perform different actions. Each time a new activity starts, the previous activity is stopped, but the system preserves the activity in a stack (the “back stack”). When a new activity starts, it is pushed onto the back stack and takes user focus. The back stack abides to the basic “last in, first out” stack mechanism, so, when the user is done with the current activity and presses the Back button, it is popped from the stack (and destroyed) and the previous activity resumes.一个应用通常有一个主activity,启动应用的时候呈现给用户。一个activity启动其他activity时会被压入到back stack中去。
When an activity is stopped because a new activity starts, it is notified of this change in state through the activity’s lifecycle callback methods. There are several callback methods that an activity might receive, due to a change in its state—whether the system is creating it, stopping it, resuming it, or destroying it—and each callback provides you the opportunity to perform specific work that’s appropriate to that state change.当一个activity因为其他activity启动而进入stopped状态时,会触发相应的lifecycle callback方法。
In your subclass, you need to implement callback methods that the system calls when the activity transitions between various states of its lifecycle, such as when the activity is being created, stopped, resumed, or destroyed. The two most important callback methods are:
onCreate():You must implement this method. The system calls this when creating your activity. Within your implementation, you should initialize the essential components of your activity. Most importantly, this is where you must callsetContentView()to define the layout for the activity’s user interface.必须实现此方法,这是调用setContentView()的地方。onPause():The system calls this method as the first indication that the user is leaving your activity (though it does not always mean the activity is being destroyed). This is usually where you should commit any changes that should be persisted beyond the current user session (because the user might not come back).用户离开activity时会调用此方法,实现此方法中通常应该将应该持久化保存的数据保存下来。
The user interface for an activity is provided by a hierarchy of views—objects derived from the View class. Each view controls a particular rectangular space within the activity’s window and can respond to user interaction.Activity的用户界面由View来提供。
The most common way to define a layout using views is with an XML layout file saved in your application resources. This way, you can maintain the design of your user interface separately from the source code that defines the activity’s behavior. You can set the layout as the UI for your activity with setContentView(), passing the resource ID for the layout. However, you can also create new Views in your activity code and build a view hierarchy by inserting new Views into a ViewGroup, then use that layout by passing the root ViewGroup to setContentView().可以使用xml来定义布局,也可以在代码中动态创建view和ViewGroup来传递给setContentView。
You must declare your activity in the manifest file in order for it to be accessible to the system. 必须在manifest文件中声明activity来被系统所知悉并可以运行之。An <activity> element can also specify various intent filters—using the <intent-filter> element—in order to declare how other application components may activate it.可以通过声明intent filter来告知系统该activity可以被什么intent来激活响应。
If you want your activity to respond to implicit intents that are delivered from other applications (and your own), then you must define additional intent filters for your activity. For each type of intent to which you want to respond, you must include an <intent-filter> that includes an <action> element and, optionally, a <category> element and/or a <data> element. These elements specify the type of intent to which your activity can respond.如果你的activity想要对其他组件发起的隐式intent进行响应,就需要在manifest中声明<intent-filter>,每个<intent-filter>必须包换<action>,可以包含<category>或<data>。
You can start another activity by calling startActivity(), passing it an Intent that describes the activity you want to start. The intent specifies either the exact activity you want to start or describes the type of action you want to perform (and the system selects the appropriate activity for you, which can even be from a different application). An intent can also carry small amounts of data to be used by the activity that is started.Your application might also want to perform some action, such as send an email, text message, or status update, using data from your activity. In this case, your application might not have its own activities to perform such actions, so you can instead leverage the activities provided by other applications on the device, which can perform the actions for you. This is where intents are really valuable—you can create an intent that describes an action you want to perform and the system launches the appropriate activity from another application. If there are multiple activities that can handle the intent, then the user can select which one to use.显式intent和隐式intent。
1 2 3 | |
Sometimes, you might want to receive a result from the activity that you start. In that case, start the activity by calling startActivityForResult() (instead of startActivity()). To then receive the result from the subsequent activity, implement the onActivityResult() callback method. When the subsequent activity is done, it returns a result in an Intent to your onActivityResult() method.
You can shut down an activity by calling its finish() method. You can also shut down a separate activity that you previously started by calling finishActivity().
Managing the lifecycle of your activities by implementing callback methods is crucial to developing a strong and flexible application. The lifecycle of an activity is directly affected by its association with other activities, its task and back stack.An activity can exist in essentially three states:
Resumed:The activity is in the foreground of the screen and has user focus. (This state is also sometimes referred to as “running”.)Paused:Another activity is in the foreground and has focus, but this one is still visible. That is, another activity is visible on top of this one and that activity is partially transparent or doesn’t cover the entire screen. A paused activity is completely alive (the Activity object is retained in memory, it maintains all state and member information, and remains attached to the window manager), but can be killed by the system in extremely low memory situations.Stopped:The activity is completely obscured by another activity (the activity is now in the “background”). A stopped activity is also still alive (the Activity object is retained in memory, it maintains all state and member information, but is not attached to the window manager). However, it is no longer visible to the user and it can be killed by the system when memory is needed elsewhere.
If an activity is paused or stopped, the system can drop it from memory either by asking it to finish (calling its finish() method), or simply killing its process. When the activity is opened again (after being finished or killed), it must be created all over.
在paused或者stopped状态的activity可能会被系统杀死。paused部分可见,stopped完全不可见。
When an activity transitions into and out of the different states described above, it is notified through various callback methods. All of the callback methods are hooks that you can override to do appropriate work when the state of your activity changes. 当一个activity在不同状态之间切换时,会调用不同的lifecycle callback方法。Your implementation of these lifecycle methods must always call the superclass implementation before doing any work, as shown in the examples above.实现这些生命周期方法时,必须调用父类的方法。
Taken together, these methods define the entire lifecycle of an activity. By implementing these methods, you can monitor three nested loops in the activity lifecycle:
- The entire lifetime of an activity happens between the call to
onCreate()and the call toonDestroy(). Your activity should perform setup of “global” state (such as defining layout) inonCreate(), and release all remaining resources inonDestroy(). For example, if your activity has a thread running in the background to download data from the network, it might create that thread inonCreate()and then stop the thread inonDestroy().Activity的整个生命周期从onCreate初始化开始,到onDestory释放资源结束。 - The visible lifetime of an activity happens between the call to
onStart()and the call toonStop(). During this time, the user can see the activity on-screen and interact with it. For example,onStop()is called when a new activity starts and this one is no longer visible. Between these two methods, you can maintain resources that are needed to show the activity to the user. For example, you can register a BroadcastReceiver in onStart() to monitor changes that impact your UI, and unregister it in onStop() when the user can no longer see what you are displaying. The system might call onStart() and onStop() multiple times during the entire lifetime of the activity, as the activity alternates between being visible and hidden to the user.对用户可见的阶段是从onStart生命周期开始,到onStop生命周期结束。 - The foreground lifetime of an activity happens between the call to
onResume()and the call toonPause(). During this time, the activity is in front of all other activities on screen and has user input focus. An activity can frequently transition in and out of the foreground—for example, onPause() is called when the device goes to sleep or when a dialog appears. Because this state can transition often, the code in these two methods should be fairly lightweight in order to avoid slow transitions that make the user wait.前台生命周期从onResume到onPause。
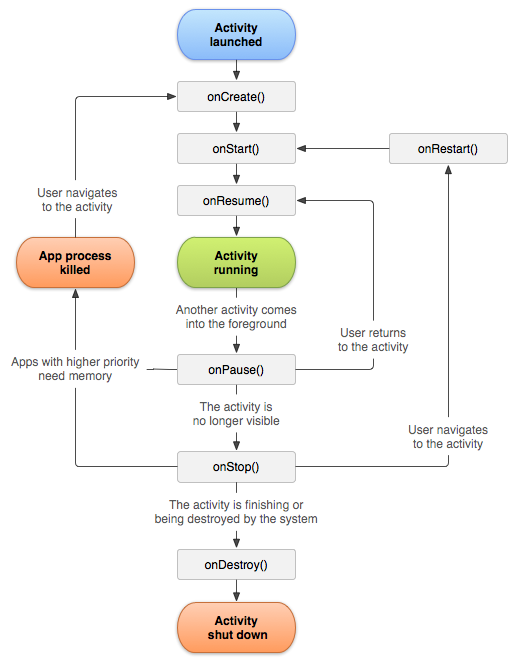
Once the activity is created, onPause() is the last method that’s guaranteed to be called before the process can be killed—if the system must recover memory in an emergency, then onStop() and onDestroy() might not be called. Therefore, you should use onPause() to write crucial persistent data (such as user edits) to storage. However, you should be selective about what information must be retained during onPause(), because any blocking procedures in this method block the transition to the next activity and slow the user experience.Activity一旦被创建,onPause是在进程被杀之前保证被调到的最后一个方法,如果系统内存紧缺,onStop和onDestory也许不会被调用。
When the system destroys an activity in order to recover memory, the Activity object is destroyed, so the system cannot simply resume it with its state intact. Instead, the system must recreate the Activity object if the user navigates back to it. Yet, the user is unaware that the system destroyed the activity and recreated it and, thus, probably expects the activity to be exactly as it was. In this situation, you can ensure that important information about the activity state is preserved by implementing an additional callback method that allows you to save information about the state of your activity: onSaveInstanceState().系统将activity摧毁后,activity重新创建后之前的状态不会被保存。The system calls onSaveInstanceState() before making the activity vulnerable to destruction. The system passes this method a Bundle in which you can save state information about the activity as name-value pairs, using methods such as putString() and putInt(). Then, if the system kills your application process and the user navigates back to your activity, the system recreates the activity and passes the Bundle to both onCreate() and onRestoreInstanceState(). Using either of these methods, you can extract your saved state from the Bundle and restore the activity state. If there is no state information to restore, then the Bundle passed to you is null (which is the case when the activity is created for the first time).在onSaveInstanceState()中被保存下来的状态会在onCreate或者onRestoreInstanceState()方法中被传递过去。There’s no guarantee that onSaveInstanceState() will be called before your activity is destroyed, because there are cases in which it won’t be necessary to save the state (such as when the user leaves your activity using the Back button, because the user is explicitly closing the activity). If the system calls onSaveInstanceState(), it does so before onStop() and possibly before onPause().onSaveInstanceState无法保证被调用,如果被调用,可能会是在onStop()或者onPause之前。
However, even if you do nothing and do not implement onSaveInstanceState(), some of the activity state is restored by the Activity class’s default implementation of onSaveInstanceState(). Specifically, the default implementation calls the corresponding onSaveInstanceState() method for every View in the layout, which allows each view to provide information about itself that should be saved. Almost every widget in the Android framework implements this method as appropriate, such that any visible changes to the UI are automatically saved and restored when your activity is recreated. The only work required by you is to provide a unique ID (with the android:id attribute) for each widget you want to save its state. If a widget does not have an ID, then the system cannot save its state.布局中的view组件如果提供了android:id属性,状态会被自动保存。Because the default implementation of onSaveInstanceState() helps save the state of the UI, if you override the method in order to save additional state information, you should always call the superclass implementation of onSaveInstanceState() before doing any work. Likewise, you should also call the superclass implementation of onRestoreInstanceState() if you override it, so the default implementation can restore view states.如果要重写onSaveInstanceState或者onRestoreInstanceState,一定要调用父类的方法。 Because onSaveInstanceState() is not guaranteed to be called, you should use it only to record the transient state of the activity (the state of the UI)—you should never use it to store persistent data. Instead, you should use onPause() to store persistent data (such as data that should be saved to a database) when the user leaves the activity.onSaveInstnceState不保证被调用,如果一定要使用,保存瞬时数据,使用onPause来保存持久化数据。
Some device configurations can change during runtime (such as screen orientation, keyboard availability, and language). When such a change occurs, Android recreates the running activity (the system calls onDestroy(), then immediately calls onCreate()). This behavior is designed to help your application adapt to new configurations by automatically reloading your application with alternative resources that you’ve provided (such as different layouts for different screen orientations and sizes).Device configuration发生变化时,系统会销毁掉Activity然后重新创建,即调用onDestory然后调用onCreate。
The order of lifecycle callbacks is well defined, particularly when the two activities are in the same process and one is starting the other. Here’s the order of operations that occur when Activity A starts Acivity B:
- Activity A’s
onPause()method executes. - Activity B’s
onCreate(),onStart(), andonResume()methods execute in sequence. (Activity B now has user focus.) - Then, if Activity A is no longer visible on screen, its
onStop()method executes.
同一个进程中ActivityA启动ActivityB时,方法执行顺序是固定的,A的onPause方法被调用,B的onCreate,onStart和onResume方法被调用,如果A不可见了,则A的onStop方法会被调用。
Fragment
A fragment must always be embedded in an activity and the fragment’s lifecycle is directly affected by the host activity’s lifecycle.However, while an activity is running (it is in the resumed lifecycle state), you can manipulate each fragment independently, such as add or remove them. When you perform such a fragment transaction, you can also add it to a back stack that’s managed by the activity—each back stack entry in the activity is a record of the fragment transaction that occurred. The back stack allows the user to reverse a fragment transaction (navigate backwards), by pressing the Back button.Fragment必须嵌入到Activity中去,并且生命周期显著受到Activity生命周期影响。一个Activity在运行状态时,可以添加或者去除fragment,进行这些fragment transaction时,可以将这些动作压入back stack。When you add a fragment as a part of your activity layout, it lives in a ViewGroup inside the activity’s view hierarchy and the fragment defines its own view layout. You can insert a fragment into your activity layout by declaring the fragment in the activity’s layout file, as a
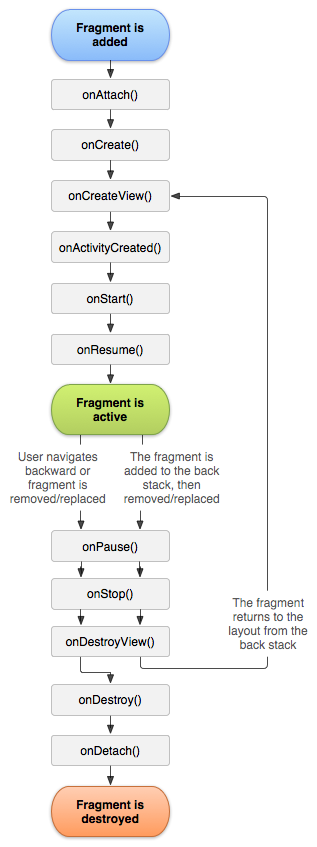
To create a fragment, you must create a subclass of Fragment (or an existing subclass of it). The Fragment class has code that looks a lot like an Activity. It contains callback methods similar to an activity, such as onCreate(), onStart(), onPause(), and onStop().Fragment生命周期方法和Activity非常类似。
Usually, you should implement at least the following lifecycle methods:
onCreate():The system calls this when creating the fragment. Within your implementation, you should initialize essential components of the fragment that you want to retain when the fragment is paused or stopped, then resumed.系统调用这个方法来创建fragment。在这个方法实现中,应该初始化必须的组件。onCreateView():The system calls this when it’s time for the fragment to draw its user interface for the first time. To draw a UI for your fragment, you must return a View from this method that is the root of your fragment’s layout. You can return null if the fragment does not provide a UI.系统调用这个方法来绘制fragment的UI。onPause():The system calls this method as the first indication that the user is leaving the fragment (though it does not always mean the fragment is being destroyed). This is usually where you should commit any changes that should be persisted beyond the current user session (because the user might not come back).用户离开fragment时系统会调用这个方法。
除了直接继承Fragment,还可以继承DialogFragment,ListFragment或者PreferenceFragment。
When the system creates this activity layout, it instantiates each fragment specified in the layout and calls the onCreateView() method for each one, to retrieve each fragment’s layout. The system inserts the View returned by the fragment directly in place of the <fragment> element.系统创建Activity布局时,会实例化各个fragment并调用其onCreateView方法来将其布局展开来插入到Activity布局文件中fragment标签所占的位置。
Each fragment requires a unique identifier that the system can use to restore the fragment if the activity is restarted (and which you can use to capture the fragment to perform transactions, such as remove it). There are three ways to provide an ID for a fragment:
+ Supply the android:id attribute with a unique ID.
+ Supply the android:tag attribute with a unique string.
+ If you provide neither of the previous two, the system uses the ID of the container view.
每个fragment需要一个唯一的id来使系统在Activity restart的时候来恢复fragment状态,或者来进行fragment transaction。android:id,android:tag都可以作为id,如果没有提供系统将使用包含fragment的containver view的id。
To make fragment transactions in your activity (such as add, remove, or replace a fragment), you must use APIs from FragmentTransaction. You can get an instance of FragmentTransaction from your Activity like this:
1 2 | |
You can then add a fragment using the add() method, specifying the fragment to add and the view in which to insert it. For example:
1 2 3 | |
Once you’ve made your changes with FragmentTransaction, you must call commit() for the changes to take effect.Before you call commit(), however, you might want to call addToBackStack(), in order to add the transaction to a back stack of fragment transactions. This back stack is managed by the activity and allows the user to return to the previous fragment state, by pressing the Back button.If you add multiple changes to the transaction (such as another add() or remove()) and call addToBackStack(), then all changes applied before you call commit() are added to the back stack as a single transaction and the Back button will reverse them all together.If you do not call addToBackStack() when you perform a transaction that removes a fragment, then that fragment is destroyed when the transaction is committed and the user cannot navigate back to it. Whereas, if you do call addToBackStack() when removing a fragment, then the fragment is stopped and will be resumed if the user navigates back.调用addToBackStack方法后,remove掉掉一个fragment,fragment会进入stopped状态,返回后会重新resume,如果么有调用会销毁掉fragment,无法返回。
To manage the fragments in your activity, you need to use FragmentManager. To get it, call getFragmentManager() from your activity.为了管理activity中的fragment,需要使用FragmentManager。
Some things that you can do with FragmentManager include:
- Get fragments that exist in the activity, with
findFragmentById()(for fragments that provide a UI in the activity layout) orfindFragmentByTag()(for fragments that do or don’t provide a UI). - Pop fragments off the back stack, with
popBackStack()(simulating a Back command by the user). - Register a listener for changes to the back stack, with
addOnBackStackChangedListener().
Calling commit() does not perform the transaction immediately. Rather, it schedules it to run on the activity’s UI thread (the “main” thread) as soon as the thread is able to do so. If necessary, however, you may call executePendingTransactions() from your UI thread to immediately execute transactions submitted by commit(). Doing so is usually not necessary unless the transaction is a dependency for jobs in other threads.调用commit后,fragment transaction不会立即执行,而是会在UI线程中被规划调度执行,如果需要立即执行可以调用executePendingTransactions()方法。You can commit a transaction using commit() only prior to the activity saving its state (when the user leaves the activity). If you attempt to commit after that point, an exception will be thrown. This is because the state after the commit can be lost if the activity needs to be restored. For situations in which its okay that you lose the commit, use commitAllowingStateLoss().如果需要保持fragment的状态,应该在用户离开activity之前调用commit,避免状态丢失,如果对这些状态不在意的话可以使用commitAllowingStateLoss()方法。
Although a Fragment is implemented as an object that’s independent from an Activity and can be used inside multiple activities, a given instance of a fragment is directly tied to the activity that contains it.fragment和包含他的activity紧密相连。Specifically, the fragment can access the Activity instance with getActivity() and easily perform tasks such as find a view in the activity layout:View listView = getActivity().findViewById(R.id.list);.Likewise, your activity can call methods in the fragment by acquiring a reference to the Fragment from FragmentManager, using findFragmentById() or findFragmentByTag(). For example:ExampleFragment fragment = (ExampleFragment) getFragmentManager().findFragmentById(R.id.example_fragment);.Fragment和Activity交互的方式。
fragment和Activity之间交互事件可以通过在fragment中定义一个interface,Activity来实现这个interface,在fragment中onAttach方法中将Activity强制转换为fragment持有的一个interface实例。
Managing the lifecycle of a fragment is a lot like managing the lifecycle of an activity. Like an activity, a fragment can exist in three states:
Resumed:The fragment is visible in the running activity.Paused:Another activity is in the foreground and has focus, but the activity in which this fragment lives is still visible (the foreground activity is partially transparent or doesn’t cover the entire screen).Stopped:The fragment is not visible. Either the host activity has been stopped or the fragment has been removed from the activity but added to the back stack. A stopped fragment is still alive (all state and member information is retained by the system). However, it is no longer visible to the user and will be killed if the activity is killed.
Also like an activity, you can retain the state of a fragment using a Bundle, in case the activity’s process is killed and you need to restore the fragment state when the activity is recreated. You can save the state during the fragment’s onSaveInstanceState() callback and restore it during either onCreate(), onCreateView(), or onActivityCreated().
The most significant difference in lifecycle between an activity and a fragment is how one is stored in its respective back stack. An activity is placed into a back stack of activities that’s managed by the system when it’s stopped, by default.However, a fragment is placed into a back stack managed by the host activity only when you explicitly request that the instance be saved by calling addToBackStack() during a transaction that removes the fragment.fragment和activity生命周期的一个不同点在于,activity会被放入系统管理的back stack中,用户返回时会重新进入activity。而fragment只有在显式调用addToBackStack后才会被保存状态在host activity管理的back stack中。
If you need a Context object within your Fragment, you can call getActivity(). However, be careful to call getActivity() only when the fragment is attached to an activity. When the fragment is not yet attached, or was detached during the end of its lifecycle, getActivity() will return null.如果fragment需要一个context,可以调用getActivity来获取,但是只能在fragment attach到activity之后才能调用,否则会返回null。
Fragments have a few extra lifecycle callbacks, however, that handle unique interaction with the activity in order to perform actions such as build and destroy the fragment’s UI. These additional callback methods are:
onAttach():Called when the fragment has been associated with the activity (the Activity is passed in here).onCreateView():Called to create the view hierarchy associated with the fragment.onActivityCreated():Called when the activity’s onCreate() method has returned.onDestroyView():Called when the view hierarchy associated with the fragment is being removed.onDetach():Called when the fragment is being disassociated from the activity.

Loaders
Loaders make it easy to asynchronously load data in an activity or fragment. Loaders have these characteristics:
- They are available to every Activity and Fragment.
- They provide asynchronous loading of data.
- They monitor the source of their data and deliver new results when the content changes.
- They automatically reconnect to the last loader’s cursor when being recreated after a configuration change. Thus, they don’t need to re-query their data.
An application that uses loaders typically includes the following:
- An Activity or Fragment.
- An instance of the LoaderManager.
- A CursorLoader to load data backed by a ContentProvider. Alternatively, you can implement your own subclass of Loader or AsyncTaskLoader to load data from some other source.
- An implementation for LoaderManager.LoaderCallbacks. This is where you create new loaders and manage your references to existing loaders.
- A way of displaying the loader’s data, such as a SimpleCursorAdapter.
- A data source, such as a ContentProvider, when using a CursorLoader.
You typically initialize a Loader within the activity’s onCreate() method, or within the fragment’s onActivityCreated() method. You do this as follows:
1
| |
The initLoader() call ensures that a loader is initialized and active. It has two possible outcomes:
- If the loader specified by the ID already exists, the last created loader is reused.
- If the loader specified by the ID does not exist,
initLoader()triggers theLoaderManager.LoaderCallbacksmethodonCreateLoader(). This is where you implement the code to instantiate and return a new loader.
When you use initLoader(), as shown above, it uses an existing loader with the specified ID if there is one. If there isn’t, it creates one. But sometimes you want to discard your old data and start over.To discard your old data, you use restartLoader(). 重新获取数据使用restartLoader()
1 2 3 4 5 6 7 8 | |
LoaderManager.LoaderCallbacks is a callback interface that lets a client interact with the LoaderManager.Loaders, in particular CursorLoader, are expected to retain their data after being stopped. This allows applications to keep their data across the activity or fragment’s onStop() and onStart() methods, so that when users return to an application, they don’t have to wait for the data to reload. You use the LoaderManager.LoaderCallbacks methods when to know when to create a new loader, and to tell the application when it is time to stop using a loader’s data.LoaderManager.LoaderCallbacks includes these methods:
onCreateLoader()— Instantiate and return a new Loader for the given ID.实例化创建一个Loader。onLoadFinished()— Called when a previously created loader has finished its load.数据加载完成后调用。onLoaderReset()— Called when a previously created loader is being reset, thus making its data unavailable.之前调用的Loader被reset时调用。
Tasks and Back stack
A task is a collection of activities that users interact with when performing a certain job. The activities are arranged in a stack (the “back stack”), in the order in which each activity is opened.
The device Home screen is the starting place for most tasks. When the user touches an icon in the application launcher (or a shortcut on the Home screen), that application’s task comes to the foreground. If no task exists for the application (the application has not been used recently), then a new task is created and the “main” activity for that application opens as the root activity in the stack.Launcher是大部分task开始的地方。If the user continues to press Back, then each activity in the stack is popped off to reveal the previous one, until the user returns to the Home screen (or to whichever activity was running when the task began). When all activities are removed from the stack, the task no longer exists.如果用户在一个task中不停的按返回键,每个被压栈的activity逐个弹出直到回到Launcher。
A task is a cohesive unit that can move to the “background” when users begin a new task or go to the Home screen, via the Home button. While in the background, all the activities in the task are stopped, but the back stack for the task remains intact—the task has simply lost focus while another task takes place.用户启动其他task或者按下Home键时,当前task进入后台状态。
To summarize the default behavior for activities and tasks:
- When Activity A starts Activity B, Activity A is stopped, but the system retains its state (such as scroll position and text entered into forms). If the user presses the Back button while in Activity B, Activity A resumes with its state restored.
- When the user leaves a task by pressing the Home button, the current activity is stopped and its task goes into the background. The system retains the state of every activity in the task. If the user later resumes the task by selecting the launcher icon that began the task, the task comes to the foreground and resumes the activity at the top of the stack.
- If the user presses the Back button, the current activity is popped from the stack and destroyed. The previous activity in the stack is resumed. When an activity is destroyed, the system does not retain the activity’s state.
- Activities can be instantiated multiple times, even from other tasks.
The way Android manages tasks and the back stack, as described above—by placing all activities started in succession in the same task and in a “last in, first out” stack—works great for most applications and you shouldn’t have to worry about how your activities are associated with tasks or how they exist in the back stack. However, you might decide that you want to interrupt the normal behavior. Perhaps you want an activity in your application to begin a new task when it is started (instead of being placed within the current task); or, when you start an activity, you want to bring forward an existing instance of it (instead of creating a new instance on top of the back stack); or, you want your back stack to be cleared of all activities except for the root activity when the user leaves the task.Android默认管理task和back stack的方式一般情况下不需要开发者担心,但是开发者也许想要与默认方式不同的方式来管理task和back stack。
You can do these things and more, with attributes in the <activity> manifest element and with flags in the intent that you pass to startActivity().In this regard, the principal <activity> attributes you can use are: http://www.slideshare.net/RanNachmany/manipulating-android-tasks-and-back-stack
taskAffinitylaunchMode:standard,singleTop,singleTask,singleInstanceallowTaskReparentingclearTaskOnLaunchalwaysRetainTaskStatefinishOnTaskLaunch
And the principal intent flags you can use are:
FLAG_ACTIVITY_NEW_TASKFLAG_ACTIVITY_CLEAR_TOPFLAG_ACTIVITY_SINGLE_TOP
Service
A Service is an application component that can perform long-running operations in the background and does not provide a user interface. Another application component can start a service and it will continue to run in the background even if the user switches to another application. Additionally, a component can bind to a service to interact with it and even perform interprocess communication (IPC).Service在后台运行,不提供UI。
A service can essentially take two forms:
Started:A service is “started” when an application component (such as an activity) starts it by callingstartService(). Once started, a service can run in the background indefinitely, even if the component that started it is destroyed. Usually, a started service performs a single operation and does not return a result to the caller.startService后,service会在后台一直运行下去。Bound:A service is “bound” when an application component binds to it by callingbindService(). A bound service offers a client-server interface that allows components to interact with the service, send requests, get results, and even do so across processes with interprocess communication (IPC). A bound service runs only as long as another application component is bound to it. Multiple components can bind to the service at once, but when all of them unbind, the service is destroyed.其他应用组件调用bindService来绑定service。
Service can work both ways—it can be started (to run indefinitely) and also allow binding. It’s simply a matter of whether you implement a couple callback methods: onStartCommand() to allow components to start it and onBind() to allow binding.service可以同时在两种状态下工作,只要实现了相应的回调方法,实现onStartCommand来start service,实现onBind来bind service。
Regardless of whether your application is started, bound, or both, any application component can use the service (even from a separate application), in the same way that any component can use an activity—by starting it with an Intent. However, you can declare the service as private, in the manifest file, and block access from other applications.不管service是started状态还是bound状态,其他应用组件可以通过Intent来启动service。可以在manifest中将service设置为private,android:export=false,来阻止其他应用来启动该service。
A service runs in the main thread of its hosting process—the service does not create its own thread and does not run in a separate process.Service运行在主线程。
A service is simply a component that can run in the background even when the user is not interacting with your application. Thus, you should create a service only if that is what you need.Service只是一个运行在后台不需要与用户交互的组件。If you need to perform work outside your main thread, but only while the user is interacting with your application, then you should probably instead create a new thread and not a service. For example, if you want to play some music, but only while your activity is running, you might create a thread in onCreate(), start running it in onStart(), then stop it in onStop(). Also consider using AsyncTask or HandlerThread, instead of the traditional Thread class.如果想在主线程之外做些操作,应该创建一个线程而不是service。可以使用AsynTask或者HandlerThread来进行相关工作而不是简单的使用Thread类。Remember that if you do use a service, it still runs in your application’s main thread by default, so you should still create a new thread within the service if it performs intensive or blocking operations.Service运行在主线程,如果需要做耗时或者阻塞操作,应该在Service中创建线程。
To create a service, you must create a subclass of Service (or one of its existing subclasses). In your implementation, you need to override some callback methods that handle key aspects of the service lifecycle and provide a mechanism for components to bind to the service, if appropriate. The most important callback methods you should override are:
onStartCommand():The system calls this method when another component, such as an activity, requests that the service be started, by callingstartService(). Once this method executes, the service is started and can run in the background indefinitely. If you implement this, it is your responsibility to stop the service when its work is done, by callingstopSelf()orstopService(). (If you only want to provide binding, you don’t need to implement this method.)其他组件调用startService时,onStartCommand方法会被调用,如果调用了此方法,应该自己来停止Service运行,调用stopSelf或者stopService来停止服务运行。onBind():The system calls this method when another component wants to bind with the service (such as to perform RPC), by callingbindService(). In your implementation of this method, you must provide an interface that clients use to communicate with the service, by returning anIBinder. You must always implement this method, but if you don’t want to allow binding, then you should return null.其他组件调用bindService时,此方法会被调用,如果希望与其他组件进行交互,可以返回一个IBinder,否则,可以返回null。onCreate():The system calls this method when the service is first created, to perform one-time setup procedures (before it calls either onStartCommand() or onBind()). If the service is already running, this method is not called.系统在Service被创建时调用onCreate一次来进行初始化工作,如果Service已经在运行了,不会调用此方法。onDestroy()The system calls this method when the service is no longer used and is being destroyed. Your service should implement this to clean up any resources such as threads, registered listeners, receivers, etc. This is the last call the service receives.系统调用onDestory来摧毁Service,在此方法实现中,应该释放资源。
If a component starts the service by calling startService() (which results in a call to onStartCommand()), then the service remains running until it stops itself with stopSelf() or another component stops it by calling stopService().If a component calls bindService() to create the service (and onStartCommand() is not called), then the service runs only as long as the component is bound to it. Once the service is unbound from all clients, the system destroys it.如果通过startService方式来启动一个service,则必须通过stopSelf或者stopService方式来停止service运行,如果是通过bindService方式来创建service,onStartCommand不会被调用,只要有应用组件bind到这个service上,这个service就会一直运行,否则当所有的应用组件从service unbind后,service会被系统销毁。
Just like an activity, a service can define intent filters that allow other components to invoke the service using implicit intents. By declaring intent filters, components from any application installed on the user’s device can potentially start your service if your service declares an intent filter that matches the intent another application passes to startService().可以在manifest文件service标签下定义intent filter来指定startService启动所对应的intent filter。
If you plan on using your service only locally (other applications do not use it), then you don’t need to (and should not) supply any intent filters. Without any intent filters, you must start the service using an intent that explicitly names the service class. 如果只打算在一个应用中使用service,不用提供intent filter,只能显式调用来startService。
A started service is one that another component starts by calling startService(), resulting in a call to the service’s onStartCommand() method.When a service is started, it has a lifecycle that’s independent of the component that started it and the service can run in the background indefinitely, even if the component that started it is destroyed. As such, the service should stop itself when its job is done by calling stopSelf(), or another component can stop it by calling stopService().An application component such as an activity can start the service by calling startService() and passing an Intent that specifies the service and includes any data for the service to use. The service receives this Intent in the onStartCommand() method.A services runs in the same process as the application in which it is declared and in the main thread of that application, by default. So, if your service performs intensive or blocking operations while the user interacts with an activity from the same application, the service will slow down activity performance.Service运行在主线程,如果有耗时操作需要另起线程。 To avoid impacting application performance, you should start a new thread inside the service.
Traditionally, there are two classes you can extend to create a started service:
Service:This is the base class for all services. When you extend this class, it’s important that you create a new thread in which to do all the service’s work, because the service uses your application’s main thread, by default, which could slow the performance of any activity your application is running.IntentService:This is a subclass of Service that uses a worker thread to handle all start requests, one at a time. This is the best option if you don’t require that your service handle multiple requests simultaneously. All you need to do is implementonHandleIntent(), which receives the intent for each start request so you can do the background work.IntentService逐个处理任务。
The IntentService does the following:
- Creates a default worker thread that executes all intents delivered to
onStartCommand()separate from your application’s main thread.创建一个工作线程来逐个处理传送到onStartCommand的Intent。 - Creates a work queue that passes one intent at a time to your
onHandleIntent()implementation, so you never have to worry about multi-threading.创建一个工作队列来给你的onHandleIntent实现每次发送一个Intent。 - Stops the service after all start requests have been handled, so you never have to call
stopSelf(). - Provides default implementation of
onBind()that returns null. - Provides a default implementation of
onStartCommand()that sends the intent to the work queue and then to youronHandleIntent()implementation.
That’s all you need: a constructor and an implementation of onHandleIntent().If you decide to also override other callback methods, such as onCreate(), onStartCommand(), or onDestroy(), be sure to call the super implementation, so that the IntentService can properly handle the life of the worker thread.只需要重载onHandleIntent方法,提供一个构造方法就可以了,如果需要重载其他方法,记得调用父类的对应方法。
1 2 3 4 5 6 7 8 9 10 11 12 13 14 15 16 17 18 19 20 21 22 23 24 25 26 27 28 29 30 31 32 33 34 35 36 37 38 39 40 41 42 43 44 45 46 47 48 49 50 51 52 53 54 55 56 57 58 59 60 61 62 63 64 65 66 67 68 | |
Notice that the onStartCommand() method must return an integer. The integer is a value that describes how the system should continue the service in the event that the system kills it.The return value from onStartCommand() must be one of the following constants:
START_NOT_STICKY:If the system kills the service afteronStartCommand()returns, do not recreate the service, unless there are pending intents to deliver. This is the safest option to avoid running your service when not necessary and when your application can simply restart any unfinished jobs.不重新创建START_STICKY:If the system kills the service after onStartCommand() returns, recreate the service and call onStartCommand(), but do not redeliver the last intent. Instead, the system calls onStartCommand() with a null intent, unless there were pending intents to start the service, in which case, those intents are delivered. This is suitable for media players (or similar services) that are not executing commands, but running indefinitely and waiting for a job.重新创建,但不传入Intent。START_REDELIVER_INTENT:If the system kills the service afteronStartCommand()returns, recreate the service and callonStartCommand()with the last intent that was delivered to the service. Any pending intents are delivered in turn. This is suitable for services that are actively performing a job that should be immediately resumed, such as downloading a file.重新创建并将最后的Intent传入。
You can start a service from an activity or other application component by passing an Intent (specifying the service to start) to startService(). The Android system calls the service’s onStartCommand() method and passes it the Intent. 其他应用组件调用startService(intent)来启动服务,系统调用service的onStartCommand(intent,flags,startId)方法,并将intent传入。
If the service does not also provide binding, the intent delivered with startService() is the only mode of communication between the application component and the service. However, if you want the service to send a result back, then the client that starts the service can create a PendingIntent for a broadcast (with getBroadcast()) and deliver it to the service in the Intent that starts the service. The service can then use the broadcast to deliver a result.可以使用PendingIntent来启动service,来让service返回给发送者一个结果。
Multiple requests to start the service result in multiple corresponding calls to the service’s onStartCommand(). However, only one request to stop the service (with stopSelf() or stopService()) is required to stop it.多次对startService的请求调用会调用onStartCommand,但是onCreate只会调用一次。
A started service must manage its own lifecycle. That is, the system does not stop or destroy the service unless it must recover system memory and the service continues to run after onStartCommand() returns. So, the service must stop itself by calling stopSelf() or another component can stop it by calling stopService().Once requested to stop with stopSelf() or stopService(), the system destroys the service as soon as possible.However, if your service handles multiple requests to onStartCommand() concurrently, then you shouldn’t stop the service when you’re done processing a start request, because you might have since received a new start request (stopping at the end of the first request would terminate the second one). To avoid this problem, you can use stopSelf(int) to ensure that your request to stop the service is always based on the most recent start request. That is, when you call stopSelf(int), you pass the ID of the start request (the startId delivered to onStartCommand()) to which your stop request corresponds. Then if the service received a new start request before you were able to call stopSelf(int), then the ID will not match and the service will not stop.必须自己来管控service的生命周期,通过stopSelf(int)中不同的startId值来实现停止service。It’s important that your application stops its services when it’s done working, to avoid wasting system resources and consuming battery power. If necessary, other components can stop the service by calling stopService(). Even if you enable binding for the service, you must always stop the service yourself if it ever received a call to onStartCommand().
You should create a bound service when you want to interact with the service from activities and other components in your application or to expose some of your application’s functionality to other applications, through interprocess communication (IPC).需哟啊从activity或者其他组件来与service进行交互时,可以创建bound service。To create a bound service, you must implement the onBind() callback method to return an IBinder that defines the interface for communication with the service. Other application components can then call bindService() to retrieve the interface and begin calling methods on the service. The service lives only to serve the application component that is bound to it, so when there are no components bound to the service, the system destroys it.
A foreground service is a service that’s considered to be something the user is actively aware of and thus not a candidate for the system to kill when low on memory. A foreground service must provide a notification for the status bar, which is placed under the “Ongoing” heading, which means that the notification cannot be dismissed unless the service is either stopped or removed from the foreground.一个前台service必须提供一个notification。
To request that your service run in the foreground, call startForeground(). This method takes two parameters: an integer that uniquely identifies the notification and the Notification for the status bar. For example:
1 2 3 4 5 6 7 | |
The integer ID you give to startForeground() must not be 0.
To remove the service from the foreground, call stopForeground(). This method takes a boolean, indicating whether to remove the status bar notification as well. This method does not stop the service. However, if you stop the service while it’s still running in the foreground, then the notification is also removed.调用stopForeground来停止service前台执行,传入boolean值来指定是否去除statusbar notification,这个方法不会停止service执行,但如果service停止执行了,notification也会被移除。
The service lifecycle—from when it’s created to when it’s destroyed—can follow two different paths:
A started service:The service is created when another component calls startService(). The service then runs indefinitely and must stop itself by calling stopSelf(). Another component can also stop the service by calling stopService(). When the service is stopped, the system destroys it..A bound service:The service is created when another component (a client) calls bindService(). The client then communicates with the service through an IBinder interface. The client can close the connection by calling unbindService(). Multiple clients can bind to the same service and when all of them unbind, the system destroys the service. (The service does not need to stop itself.)

By implementing these methods, you can monitor two nested loops of the service’s lifecycle:
- The entire lifetime of a service happens between the time onCreate() is called and the time onDestroy() returns. Like an activity, a service does its initial setup in onCreate() and releases all remaining resources in onDestroy(). For example, a music playback service could create the thread where the music will be played in onCreate(), then stop the thread in onDestroy().The onCreate() and onDestroy() methods are called for all services, whether they’re created by startService() or bindService().
- The active lifetime of a service begins with a call to either onStartCommand() or onBind(). Each method is handed the Intent that was passed to either startService() or bindService(), respectively. If the service is started, the active lifetime ends the same time that the entire lifetime ends (the service is still active even after onStartCommand() returns). If the service is bound, the active lifetime ends when onUnbind() returns.
Bound Services
AIDL
ContentProviders
Content providers manage access to a structured set of data. They encapsulate the data, and provide mechanisms for defining data security. Content providers are the standard interface that connects data in one process with code running in another process.ContentProvider提供管理数据的方法,他们封装数据并保证数据安全性。When you want to access data in a content provider, you use the ContentResolver object in your application’s Context to communicate with the provider as a client. The ContentResolver object communicates with the provider object, an instance of a class that implements ContentProvider. The provider object receives data requests from clients, performs the requested action, and returns the results.想要访问ContentProvider提供的数据,需要使用ContentResolver来做一层代理。
Android itself includes content providers that manage data such as audio, video, images, and personal contact information. You can see some of them listed in the reference documentation for the android.provider package. With some restrictions, these providers are accessible to any Android application.Android本身提供了访问audio,video,images和personal contact information等数据的ContentProvider,其他应用程序只需要有一定的权限就可以使用这些数据。
ContentProvider Basics
A content provider manages access to a central repository of data. A provider is part of an Android application, which often provides its own UI for working with the data. However, content providers are primarily intended to be used by other applications, which access the provider using a provider client object. Together, providers and provider clients offer a consistent, standard interface to data that also handles inter-process communication and secure data access.ContentProvider是Android应用程序的一部分,通常提供操作数据的自己的UI。Provider和Provider clients 提供了一个持久的标准接口来操作数据,同事进行 IPC 和 数据安全性。An application accesses the data from a content provider with a ContentResolver client object. This object has methods that call identically-named methods in the provider object, an instance of one of the concrete subclasses of ContentProvider. The ContentResolvermethods provide the basic “CRUD” (create, retrieve, update, and delete) functions of persistent storage.The ContentResolver object in the client application’s process and the ContentProvider object in the application that owns the provider automatically handle inter-process communication. ContentProvider also acts as an abstraction layer between its repository of data and the external appearance of data as tables.ContentResolver和ContentProvider自动进行IPC,CotentProvider在数据和操作数据的接口之间充当了一个抽象层。
A content URI is a URI that identifies data in a provider. Content URIs include the symbolic name of the entire provider (its authority) and a name that points to a table (a path). When you call a client method to access a table in a provider, the content URI for the table is one of the arguments.In the preceding lines of code, the constant CONTENT_URI contains the content URI of the user dictionary’s “words” table. The ContentResolver object parses out the URI’s authority, and uses it to “resolve” the provider by comparing the authority to a system table of known providers.ContentResolver解析URI authority,利用他来和系统中所知的providet table进行对比解析得出正确的ContentProvider。 The ContentResolver can then dispatch the query arguments to the correct provider.
The Uri and Uri.Builder classes contain convenience methods for constructing well-formed Uri objects from strings. The ContentUris contains convenience methods for appending id values to a URI. The previous snippet Uri singleUri = ContentUris.withAppendedId(UserDictionary.Words.CONTENT_URI,4);uses withAppendedId() to append an id to the UserDictionary content URI.
To retrieve data from a provider, follow these basic steps:
- Request the read access permission for the provider.
- Define the code that sends a query to the provider.
为了从ContentProvider中获取数据,需要申请ContentProvider的读权限,定义查询ContentProvider的代码。
To retrieve data from a provider, your application needs “read access permission” for the provider. You can’t request this permission at run-time; instead, you have to specify that you need this permission in your manifest, using the <uses-permission> element and the exact permission name defined by the provider. When you specify this element in your manifest, you are in effect “requesting” this permission for your application. When users install your application, they implicitly grant this request.为了读取ContentProvider的数据,应用需要有ContentProvider定义的权限,可以读取数据。
To retrieve data from a provider, your application needs “read access permission” for the provider. You can’t request this permission at run-time; instead, you have to specify that you need this permission in your manifest, using the <uses-permission> element and the exact permission name defined by the provider. When you specify this element in your manifest, you are in effect “requesting” this permission for your application. When users install your application, they implicitly grant this request.为了获取ContentProvider的数据,必须在manifest中申请相关权限。
The ContentResolver.query() client method always returns a Cursor containing the columns specified by the query’s projection for the rows that match the query’s selection criteria. A Cursor object provides random read access to the rows and columns it contains. Using Cursor methods, you can iterate over the rows in the results, determine the data type of each column, get the data out of a column, and examine other properties of the results. Some Cursor implementations automatically update the object when the provider’s data changes, or trigger methods in an observer object when the Cursor changes, or both.ContentResolver.query()返回一个Cursor。If no rows match the selection criteria, the provider returns a Cursor object for which Cursor.getCount() is 0 (an empty cursor).如果没有行匹配查询条件,则返回一个Cursor.getCount()为0的Cursor。If an internal error occurs, the results of the query depend on the particular provider. It may choose to return null, or it may throw an Exception.Since a Cursor is a “list” of rows, a good way to display the contents of a Cursor is to link it to a ListView via a SimpleCursorAdapter.To back a ListView with a Cursor, the cursor must contain a column named ID. Because of this, the query shown previously retrieves the _ID column for the “words” table, even though the ListView doesn’t display it. This restriction also explains why most providers have a ID column for each of their tables.
1 2 3 4 5 6 7 8 9 10 11 12 13 14 15 16 17 18 19 20 21 | |
1 2 3 4 5 6 7 8 9 10 11 12 13 14 15 16 17 18 19 20 21 22 23 24 25 26 27 28 29 | |
A provider’s application can specify permissions that other applications must have in order to access the provider’s data. These permissions ensure that the user knows what data an application will try to access. Based on the provider’s requirements, other applications request the permissions they need in order to access the provider. End users see the requested permissions when they install the application.包含ContentProvider的应用程序定义一个应用程序获取这个ContentProvider所需的权限,要获取应用数据的应用程序申请权限,应用程序在安装时会将需要的各种权限展现给用户。
If a provider’s application doesn’t specify any permissions, then other applications have no access to the provider’s data. However, components in the provider’s application always have full read and write access, regardless of the specified permissions.如果包含ContentProvider的应用程序没有定义访问ContentProvider数据需要的各种权限,则在这个应用程序外部无法访问这个ContentProvider数据,但是应用程序内部可以读写ContentProvider数据。
1 2 3 4 5 6 7 8 9 10 11 12 13 14 15 16 17 18 19 20 21 | |
The data for the new row goes into a single ContentValues object, which is similar in form to a one-row cursor.要插入的一行数据。The columns in this object don’t need to have the same data type, and if you don’t want to specify a value at all, you can set a column to null using ContentValues.putNull().
The content URI returned in newUri identifies the newly-added row, with the following format:content://user_dictionary/words/<id_value>,The <id_value> is the contents of _ID for the new row. Most providers can detect this form of content URI automatically and then perform the requested operation on that particular row.To get the value of _ID from the returned Uri, call ContentUris.parseId().插入数据后返回一个URI,可以使用ContentUris.parseId(uri)来获取插入数据的_ID字段。
To update a row, you use a ContentValues object with the updated values just as you do with an insertion, and selection criteria just as you do with a query. The client method you use is ContentResolver.update(). You only need to add values to the ContentValues object for columns you’re updating. If you want to clear the contents of a column, set the value to null.更新操作和插入操作差不多。
1 2 3 4 5 6 7 8 9 10 11 12 13 14 15 16 17 18 19 20 21 22 23 | |
Deleting rows is similar to retrieving row data: you specify selection criteria for the rows you want to delete and the client method returns the number of deleted rows. The following snippet deletes rows whose appid matches “user”. The method returns the number of deleted rows.删除操作返回删除的行数。
1 2 3 4 5 6 7 8 9 10 11 12 13 14 15 | |
Three alternative forms of provider access are important in application development:
Batch access: You can create a batch of access calls with methods in the ContentProviderOperation class, and then apply them withContentResolver.applyBatch().批量操作Asynchronous queries: You should do queries in a separate thread. One way to do this is to use aCursorLoaderobject. 异步查询Data access via intents: Although you can’t send an intent directly to a provider, you can send an intent to the provider’s application, which is usually the best-equipped to modify the provider’s data.向包含ContentProvider的应用程序发Intent,由应用程序来操作数据。
To access a provider in “batch mode”, you create an array of ContentProviderOperation objects and then dispatch them to a content provider with ContentResolver.applyBatch(). You pass the content provider’s authority to this method, rather than a particular content URI. This allows each ContentProviderOperation object in the array to work against a different table. A call to ContentResolver.applyBatch() returns an array of results.
Intents can provide indirect access to a content provider. You allow the user to access data in a provider even if your application doesn’t have access permissions, either by getting a result intent back from an application that has permissions, or by activating an application that has permissions and letting the user do work in it.Intent可以间接来获取数据。
You can access data in a content provider, even if you don’t have the proper access permissions, by sending an intent to an application that does have the permissions and receiving back a result intent containing “URI” permissions. These are permissions for a specific content URI that last until the activity that receives them is finished. The application that has permanent permissions grants temporary permissions by setting a flag in the result intent:
Read permission:FLAG_GRANT_READ_URI_PERMISSIONWrite permission:FLAG_GRANT_WRITE_URI_PERMISSION
These flags don’t give general read or write access to the provider whose authority is contained in the content URI. The access is only for the URI itself.
A provider defines URI permissions for content URIs in its manifest, using the android:grantUriPermission attribute of the <provider> element, as well as the <grant-uri-permission> child element of the <provider> element.
For example, you can retrieve data for a contact in the Contacts Provider, even if you don’t have the READ_CONTACTS permission. You might want to do this in an application that sends e-greetings to a contact on his or her birthday. Instead of requesting READ_CONTACTS, which gives you access to all of the user’s contacts and all of their information, you prefer to let the user control which contacts are used by your application. To do this, you use the following process:
- Your application sends an intent containing the action
ACTION_PICKand the “contacts” MIME typeCONTENT_ITEM_TYPE, using the methodstartActivityForResult(). - Because this intent matches the intent filter for the People app’s “selection” activity, the activity will come to the foreground.
- In the selection activity, the user selects a contact to update. When this happens, the selection activity calls
setResult(resultcode, intent)to set up a intent to give back to your application. The intent contains the contentURIof the contact the user selected, and the “extras” flagsFLAG_GRANT_READ_URI_PERMISSION. These flags grant URI permission to your app to read data for the contact pointed to by the content URI. The selection activity then callsfinish()to return control to your application. - Your activity returns to the foreground, and the system calls your activity’s
onActivityResult()method. This method receives the result intent created by the selection activity in the People app. With the content URI from the result intent, you can read the contact’s data from the Contacts Provider, even though you didn’t request permanent read access permission to the provider in your manifest. You can then get the contact’s birthday information or his or her email address and then send the e-greeting.
Content providers can return standard MIME media types, or custom MIME type strings, or both.MIME types have the format:type/subtype.Custom MIME type strings, also called “vendor-specific” MIME types, have more complex type and subtype values. The type value is always vnd.android.cursor.dir for multiple rows, or vnd.android.cursor.itemfor a single row.
The subtype is provider-specific. The Android built-in providers usually have a simple subtype. For example, the when the Contacts application creates a row for a telephone number, it sets the following MIME type in the row:vnd.android.cursor.item/phone_v2.Notice that the subtype value is simply phone_v2.
Other provider developers may create their own pattern of subtypes based on the provider’s authority and table names. For example, consider a provider that contains train timetables. The provider’s authority is com.example.trains, and it contains the tables Line1, Line2, and Line3. In response to the content URI content://com.example.trains/Line1 for table Line1, the provider returns the MIME type vnd.android.cursor.dir/vnd.example.line1,In response to the content URI content://com.example.trains/Line2/5 for row 5 in table Line2, the provider returns the MIME type vnd.android.cursor.item/vnd.example.line2. Most content providers define contract class constants for the MIME types they use. The Contacts Provider contract class ContactsContract.RawContacts, for example, defines the constant CONTENT_ITEM_TYPE for the MIME type of a single raw contact row.
Creating a Content Provider
Follow these steps to build your provider:
Design the raw storage for your data. A content provider offers data in two ways:
File data:Data that normally goes into files, such as photos, audio, or videos. Store the files in your application’s private space. In response to a request for a file from another application, your provider can offer a handle to the file.数据以文件方式保存。"Structured" data:Data that normally goes into a database, array, or similar structure. Store the data in a form that’s compatible with tables of rows and columns. A row represents an entity, such as a person or an item in inventory. A column represents some data for the entity, such a person’s name or an item’s price. A common way to store this type of data is in an SQLite database, but you can use any type of persistent storage. 以数据库方式存储。
Define a concrete implementation of the ContentProvider class and its required methods. This class is the interface between your data and the rest of the Android system. 继承
ContentProvider并实现方法。- Define the provider’s authority string, its content URIs, and column names. If you want the provider’s application to handle intents, also define intent actions, extras data, and flags. Also define the permissions that you will require for applications that want to access your data. You should consider defining all of these values as constants in a separate contract class; later, you can expose this class to other developers. For more information about content URIs, see the section Designing Content URIs. For more information about intents, see the section Intents and Data Access.
- Add other optional pieces, such as sample data or an implementation of AbstractThreadedSyncAdapter that can synchronize data between the provider and cloud-based data.
A content provider is the interface to data saved in a structured format. Before you create the interface, you must decide how to store the data. You can store the data in any form you like, and then design the interface to read and write the data as necessary.ContentProvider是数据访问的接口,在创建接口之前先确定如何保存数据然后定义读写数据的接口。These are some of the data storage technologies that are available in Android:
- The Android system includes an SQLite database API that Android’s own providers use to store table-oriented data. The
SQLiteOpenHelperclass helps you create databases, and theSQLiteDatabaseclass is the base class for accessing databases.Remember that you don’t have to use a database to implement your repository. A provider appears externally as a set of tables, similar to a relational database, but this is not a requirement for the provider’s internal implementation.Android系统提供来SQLite支持,可以使用SQLiteOpenHelper来创建数据库,SQLiteDatabase来访问数据库,对外ContentProvider表现为几张表,但并不代表内部一定要以表的形式来存储数据。 - For storing file data, Android has a variety of file-oriented APIs. If you’re designing a provider that offers media-related data such as music or videos, you can have a provider that combines table data and files.如果需要提供媒体相关的数据,如音乐或者视频可以使用文件来存储数据。
- For working with network-based data, use classes in
java.netandandroid.net. You can also synchronize network-based data to a local data store such as a database, and then offer the data as tables or files. 对于网络存储的数据,可以使用java.net和android.net来和本地保存同步。
Implementing a content provider involves always the following steps:
- Create a class that extends ContentProvider
- Create a contract class
- Create the UriMatcher definition
- Implement the onCreate() method
- Implement the getType() method
- Implement the CRUD methods
- Add the content provider to your AndroidManifest.xml
Calendar Provider
Contacts Provider
Storage Access Framework
Intent and Intent Filters
Three of the core components of an application — activities, services, and broadcast receivers — are activated through messages, called intents. Intent messaging is a facility for late run-time binding between components in the same or different applications. The intent itself, an Intent object, is a passive data structure holding an abstract description of an operation to be performed — or, often in the case of broadcasts, a description of something that has happened and is being announced. There are separate mechanisms for delivering intents to each type of component:
- An Intent object is passed to
Context.startActivity()orActivity.startActivityForResult()to launch an activity or get an existing activity to do something new. (It can also be passed toActivity.setResult()to return information to the activity that calledstartActivityForResult().) - An Intent object is passed to
Context.startService()to initiate a service or deliver new instructions to an ongoing service. Similarly, an intent can be passed toContext.bindService()to establish a connection between the calling component and a target service. It can optionally initiate the service if it’s not already running. - Intent objects passed to any of the broadcast methods (such as
Context.sendBroadcast(),Context.sendOrderedBroadcast(), orContext.sendStickyBroadcast()) are delivered to all interested broadcast receivers. Many kinds of broadcasts originate in system code.
An Intent object is a bundle of information. It contains information of interest to the component that receives the intent (such as the action to be taken and the data to act on) plus information of interest to the Android system (such as the category of component that should handle the intent and instructions on how to launch a target activity). Principally, it can contain the following:
Component name:The name of the component that should handle the intent. This field is a ComponentName object — a combination of the fully qualified class name of the target component (for example “com.example.project.app.FreneticActivity”) and the package name set in the manifest file of the application where the component resides (for example, “com.example.project”). The package part of the component name and the package name set in the manifest do not necessarily have to match.组件名称The component name is optional. If it is set, the Intent object is delivered to an instance of the designated class. If it is not set, Android uses other information in the Intent object to locate a suitable target — see Intent Resolution, later in this document.The component name is set bysetComponent(),setClass(), orsetClassName()and read bygetComponent(.Component name可以通过Intent方法setComponent,setClass,setClassName来设置,通过getComponent来读取。Action:A string naming the action to be performed — or, in the case of broadcast intents, the action that took place and is being reported. The Intent class defines a number of action constants, including these:ACTION_CALL,ACTION_EDIT,ACTION_MAIN,ACTION_SYNC由activity来接收处理,ACTION_BATTERY_LOW,ACTION_HEADSET_PLUG,ACTION_SCREEN_ON,ACTION_TIMEZONE_CHANGED由Broadcast receiver来接收处理。The action in an Intent object is set by thesetAction()method and read bygetAction().Action可以通过Intent方法setAction来设置,getAction来读取。Data:The URI of the data to be acted on and the MIME type of that data. Different actions are paired with different kinds of data specifications. For example, if the action field isACTION_EDIT, the data field would contain the URI of the document to be displayed for editing. If the action isACTION_CALL, the data field would be atel:URI with the number to call. Similarly, if the action isACTION_VIEWand the data field is anhttp:URI, the receiving activity would be called upon to download and display whatever data the URI refers to.When matching an intent to a component that is capable of handling the data, it’s often important to know the type of data (its MIME type) in addition to its URI. For example, a component able to display image data should not be called upon to play an audio file.在解析应用时,除了URI之外最好知道data的mime类型。In many cases, the data type can be inferred from the URI — particularly content: URIs, which indicate that the data is located on the device and controlled by a content provider .通常情况下,可以从URI来推断出数据类型。 But the type can also be explicitly set in the Intent object. ThesetData()method specifies data only as a URI,setType()specifies it only as aMIMEtype, andsetDataAndType()specifies it as both a URI and a MIME type. The URI is read bygetData()and the type bygetType().Category:A string containing additional information about the kind of component that should handle the intent.指定什么类型的应用可以对Intent作出响应。 Any number of category descriptions can be placed in an Intent object. As it does for actions, the Intent class defines several category constants, including these:CATEGORY_BROWSABLE,CATEGORY_GADGET,CATEGORY_HOME,CATEGORY_LAUNCHER,CATEGORY_PREFERENCE.TheaddCategory()method places a category in an Intent object,removeCategory()deletes a category previously added, andgetCategories()gets the set of all categories currently in the object.Extras:Key-value pairs for additional information that should be delivered to the component handling the intent. Just as some actions are paired with particular kinds of data URIs, some are paired with particular extras.键值对来提供额外的信息。The Intent object has a series ofput...()methods for inserting various types of extra data and a similar set ofget...()methods for reading the data. These methods parallel those forBundleobjects. In fact, the extras can be installed and read as aBundleusing theputExtras()andgetExtras()methods.Flags:Flags of various sorts. Many instruct the Android system how to launch an activity (for example, which task the activity should belong to) and how to treat it after it’s launched (for example, whether it belongs in the list of recent activities). All these flags are defined in the Intent class.
Android delivers an explicit intent to an instance of the designated target class. Nothing in the Intent object other than the component name matters for determining which component should get the intent.显式Intent
A different strategy is needed for implicit intents. In the absence of a designated target, the Android system must find the best component (or components) to handle the intent — a single activity or service to perform the requested action or the set of broadcast receivers to respond to the broadcast announcement. It does so by comparing the contents of the Intent object to intent filters, structures associated with components that can potentially receive intents. Filters advertise the capabilities of a component and delimit the intents it can handle. They open the component to the possibility of receiving implicit intents of the advertised type. If a component does not have any intent filters, it can receive only explicit intents.处理隐式Intent需要不同的策略。通过比较Intent与应用声明的intent filter来解析Intent。A component with filters can receive both explicit and implicit intents.Only three aspects of an Intent object are consulted when the object is tested against an intent filter:
- action
- data (both URI and data type)
- category
The extras and flags play no part in resolving which component receives an intent.
For an intent to pass the category test, every category in the Intent object must match a category in the filter. The filter can list additional categories, but it cannot omit any that are in the intent.Intent中只要有一个和intent filter中category相匹配,就可以通过。In principle, therefore, an Intent object with no categories should always pass this test, regardless of what’s in the filter. That’s mostly true. However, with one exception, Android treats all implicit intents passed to startActivity() as if they contained at least one category: "android.intent.category.DEFAULT" (the CATEGORY_DEFAULT constant). Therefore, activities that are willing to receive implicit intents must include "android.intent.category.DEFAULT" in their intent filters.Activity如果想要通过隐式intent来启动,必须在intent filter中声明android.intent.category.DEFAULT。 (Filters with “android.intent.action.MAIN” and “android.intent.category.LAUNCHER” settings are the exception. They mark activities that begin new tasks and that are represented on the launcher screen. They can include “android.intent.category.DEFAULT” in the list of categories, but don’t need to.) android.intent.action.MAIN和android.intent.category.LAUNCHER是例外,有这个intent filter的应用会显示在桌面上,可以包含android.intent.category.DEFAULT在intent filter的category中,但是没必要。
1 2 3 4 5 | |
Each <data> element can specify a URI and a data type (MIME media type). There are separate attributes — scheme, host, port, and path — for each part of the URI:scheme://host:port/path.For example, in the following URI,content://com.example.project:200/folder/subfolder/etc,the scheme is “content”, the host is “com.example.project”, the port is “200”, and the path is “folder/subfolder/etc”. The host and port together constitute the URI authority; if a host is not specified, the port is ignored.When the URI in an Intent object is compared to a URI specification in a filter, it’s compared only to the parts of the URI actually mentioned in the filter. For example, if a filter specifies only a scheme, all URIs with that scheme match the filter. If a filter specifies a scheme and an authority but no path, all URIs with the same scheme and authority match, regardless of their paths. If a filter specifies a scheme, an authority, and a path, only URIs with the same scheme, authority, and path match. However, a path specification in the filter can contain wildcards to require only a partial match of the path.URI path部分可以使用通配符。
The type attribute of a <data> element specifies the MIME type of the data. It’s more common in filters than a URI. Both the Intent object and the filter can use a "*" wildcard for the subtype field — for example, "text/*" or "audio/*" — indicating any subtype matches.The data test compares both the URI and the data type in the Intent object to a URI and data type specified in the filter. The rules are as follows:
- An Intent object that contains neither a URI nor a data type passes the test only if the filter likewise does not specify any URIs or data types.Intent中不包含URI和data type,只有在intent filter也不包含URI和data type时才能通过intent resolve。
- An Intent object that contains a URI but no data type (and a type cannot be inferred from the URI) passes the test only if its URI matches a URI in the filter and the filter likewise does not specify a type. This will be the case only for URIs like
mailto:andtel:that do not refer to actual data.Intent中包含有URI但不包含data type时,只有intent filter同样如此时才能通过intent resolve。 - An Intent object that contains a data type but not a URI passes the test only if the filter lists the same data type and similarly does not specify a URI.
- An Intent object that contains both a URI and a data type (or a data type can be inferred from the URI) passes the data type part of the test only if its type matches a type listed in the filter. It passes the URI part of the test either if its URI matches a URI in the filter or if it has a
content:orfile:URI and the filter does not specify a URI. In other words, a component is presumed to supportcontent:andfile:data if its filter lists only a data type.如果一个Intent中包含有URI和data type,能通过data type解析的条件是和intent filter中类型中的一个相匹配。URI部分匹配要么和intent filter中相匹配,要么Intent中包含有content:或file:类型的URI,而intent filter中没有指定URI,就是说,应用程序假定支持content:和file:类型URI,如果intent filter只列举了data type。 - If an intent can pass through the filters of more than one activity or service, the user may be asked which component to activate. An exception is raised if no target can be found.
The last rule shown above for the data test, rule (d), reflects the expectation that components are able to get local data from a file or content provider. Therefore, their filters can list just a data type and do not need to explicitly name the content: and file: schemes. This is a typical case. A <data> element like the following, for example, tells Android that the component can get image data from a content provider and display it:<data android:mimeType="image/*" />.一个应用组件可以从file或者content provider中来获取本地数据。Since most available data is dispensed by content providers, filters that specify a data type but not a URI are perhaps the most common.
Another common configuration is filters with a scheme and a data type. For example, a <data> element like the following tells Android that the component can get video data from the network and display it:<data android:scheme="http" android:type="video/*" />Consider, for example, what the browser application does when the user follows a link on a web page. It first tries to display the data (as it could if the link was to an HTML page). If it can’t display the data, it puts together an implicit intent with the scheme and data type and tries to start an activity that can do the job. If there are no takers, it asks the download manager to download the data. That puts it under the control of a content provider, so a potentially larger pool of activities (those with filters that just name a data type) can respond.点击网页上一个链接时,浏览器首先尝试解析链接数据并展示,如果无法展示,浏览器会把链接中的schema和data type放到一起来组成隐式intent,然后startActivity,如果没有activity能处理这个intent,会由download manager来将数据下载下来,下载完成后,会有能处理这种数据类型的应用来对下载下来的数据进行响应。
Intents are matched against intent filters not only to discover a target component to activate, but also to discover something about the set of components on the device.Intent和intent filter 匹配不仅仅用来找到能响应对应intent的应用,还可以用来发现能对某些action和category进行响应的应用分组。 For example, the Android system populates the application launcher, the top-level screen that shows the applications that are available for the user to launch, by finding all the activities with intent filters that specify the “android.intent.action.MAIN” action and “android.intent.category.LAUNCHER” category (as illustrated in the previous section). It then displays the icons and labels of those activities in the launcher.launcher应用程序的获取。 Similarly, it discovers the home screen by looking for the activity with “android.intent.category.HOME” in its filter. home screen桌面应用。Whenever you press the home button, all the applications installed in your phone which have CATEGORY.HOME category and Action_Main in intent-filter in their AndroidManifest.xml will be listed (unless you have chosen some application as default) in a chooser for the user to select which HOME they want to launch.
Your application can use intent matching is a similar way. The PackageManager has a set of query...() methods that return all components that can accept a particular intent, and a similar series of resolve...() methods that determine the best component to respond to an intent. For example, queryIntentActivities() returns a list of all activities that can perform the intent passed as an argument, and queryIntentServices() returns a similar list of services. Neither method activates the components; they just list the ones that can respond. There’s a similar method, queryBroadcastReceivers(), for broadcast receivers.
Process and Threads
When an application component starts and the application does not have any other components running, the Android system starts a new Linux process for the application with a single thread of execution. By default, all components of the same application run in the same process and thread (called the “main” thread). If an application component starts and there already exists a process for that application (because another component from the application exists), then the component is started within that process and uses the same thread of execution. However, you can arrange for different components in your application to run in separate processes, and you can create additional threads for any process.当一个应用组件启动时,如果所在应用没有其他组件在运行,则Android系统会创建一个Linux进程来运行它,这个Linux进程默认是单线程的,又叫做主线程。如果应用组件启动时,它所在应用程序已经有组件在运行,则组件会运行在应用程序所在地进程中。默认如此,不过可以修改这种行为。
By default, all components of the same application run in the same process and most applications should not change this. However, if you find that you need to control which process a certain component belongs to, you can do so in the manifest file.默认应用程序组件运行在同一个进程中。The manifest entry for each type of component element—<activity>, <service>, <receiver>, and <provider>—supports an android:process attribute that can specify a process in which that component should run.四大组件在manifest中支持android:processtag来指定组件运行所在地进程。 You can set this attribute so that each component runs in its own process or so that some components share a process while others do not. You can also set android:process so that components of different applications run in the same process—provided that the applications share the same Linux user ID and are signed with the same certificates.不同应用如果uid相同,签名相同(sharedUid的前提是签名相同),则可以使不同应用程序运行在同一个进程中。The <application> element also supports an android:process attribute, to set a default value that applies to all components.<application>也支持android:processtag,来将应用程序中各组件运行在同一个进程中。
Android might decide to shut down a process at some point, when memory is low and required by other processes that are more immediately serving the user. Application components running in the process that’s killed are consequently destroyed. A process is started again for those components when there’s again work for them to do.When deciding which processes to kill, the Android system weighs their relative importance to the user. Android回收内存时会将进程杀死,进程中的各个组件就会被销毁掉。
The Android system tries to maintain an application process for as long as possible, but eventually needs to remove old processes to reclaim memory for new or more important processes. To determine which processes to keep and which to kill, the system places each process into an “importance hierarchy” based on the components running in the process and the state of those components. Processes with the lowest importance are eliminated first, then those with the next lowest importance, and so on, as necessary to recover system resources.系统杀进程时,会将不那么重要的进程先杀死。
There are five levels in the importance hierarchy. The following list presents the different types of processes in order of importance (the first process is most important and is killed last):进程重要性有5个级别:
Foreground process:A process that is required for what the user is currently doing.正在与用户进行交互的前台进程。 A process is considered to be in the foreground if any of the following conditions are true:如果应用中组件做了以下任何一件事情,则会被视为前台进程。- It hosts an Activity that the user is interacting with (the Activity’s
onResume()method has been called).Activity正处于onResumelifecycle中。 - It hosts a
Servicethat’s bound to the activity that the user is interacting with.进程中service和一个正在与用户交互的activity在绑定。It hosts aServicethat’s running “in the foreground”—the service has calledstartForeground().进程中的service调用了startForeground。It hosts a Service that’s executing one of its lifecycle callbacks (onCreate(),onStart(), oronDestroy()).进程中的service正在执行onCreate,onStart或onDestory生命周期回调方法。 - It hosts a
BroadcastReceiverthat’s executing itsonReceive()method.进程中的BroadcastReceiver正在执行onReceive()方法。 Generally, only a few foreground processes exist at any given time. They are killed only as a last resort—if memory is so low that they cannot all continue to run. Generally, at that point, the device has reached a memory paging state, so killing some foreground processes is required to keep the user interface responsive.
- It hosts an Activity that the user is interacting with (the Activity’s
Visible process:A process that doesn’t have any foreground components, but still can affect what the user sees on screen. A process is considered to be visible if either of the following conditions are true:只要以下几种情况发生一个,一个进程就能被视为visible。- It hosts an Activity that is not in the foreground, but is still visible to the user (its
onPause()method has been called). This might occur, for example, if the foreground activity started a dialog, which allows the previous activity to be seen behind it.进程中有Activity不在前台,但仍然可见。Activity正在经历onPause生命周期回调函数。 - It hosts a
Servicethat’s bound to a visible (or foreground) activity.进程中有service 被绑定到一个visible activity。 A visible process is considered extremely important and will not be killed unless doing so is required to keep all foreground processes running.
- It hosts an Activity that is not in the foreground, but is still visible to the user (its
Service process:A process that is running a service that has been started with thestartService()method and does not fall into either of the two higher categories.进程中有service通过startService来运行并且其他组件没有落入上面的两种情况中。 Although service processes are not directly tied to anything the user sees, they are generally doing things that the user cares about (such as playing music in the background or downloading data on the network), so the system keeps them running unless there’s not enough memory to retain them along with all foreground and visible processes.Background process:A process holding an activity that’s not currently visible to the user (the activity’sonStop()method has been called). These processes have no direct impact on the user experience, and the system can kill them at any time to reclaim memory for a foreground, visible, or service process. Usually there are many background processes running, so they are kept in an LRU (least recently used) list to ensure that the process with the activity that was most recently seen by the user is the last to be killed. If an activity implements its lifecycle methods correctly, and saves its current state, killing its process will not have a visible effect on the user experience, because when the user navigates back to the activity, the activity restores all of its visible state. 进程中有对用户不可见的activity,很多后台进程在运行,这些对用户不可见的activity被保存在一个LRU队列中。Empty process:A process that doesn’t hold any active application components. The only reason to keep this kind of process alive is for caching purposes, to improve startup time the next time a component needs to run in it. The system often kills these processes in order to balance overall system resources between process caches and the underlying kernel caches.进程中没有任何活动的组件,系统保留这种进程仅仅时为了cache目的。
Android ranks a process at the highest level it can, based upon the importance of the components currently active in the process. In addition, a process’s ranking might be increased because other processes are dependent on it—a process that is serving another process can never be ranked lower than the process it is serving.Because a process running a service is ranked higher than a process with background activities, an activity that initiates a long-running operation might do well to start a service for that operation, rather than simply create a worker thread—particularly if the operation will likely outlast the activity.由于service process 优先级比background process高,如果需要在activity中做长时间的操作,不如start a service来做这些longing-running operation,而不是在activity中创建一个worker thread来做这些操作。For example, an activity that’s uploading a picture to a web site should start a service to perform the upload so that the upload can continue in the background even if the user leaves the activity. Using a service guarantees that the operation will have at least “service process” priority, regardless of what happens to the activity. This is the same reason that broadcast receivers should employ services rather than simply put time-consuming operations in a thread.
When an application is launched, the system creates a thread of execution for the application, called “main.” This thread is very important because it is in charge of dispatching events to the appropriate user interface widgets, including drawing events. It is also the thread in which your application interacts with components from the Android UI toolkit (components from the android.widget and android.view packages). As such, the main thread is also sometimes called the UI thread.主线程(UI线程)
The system does not create a separate thread for each instance of a component. All components that run in the same process are instantiated in the UI thread, and system calls to each component are dispatched from that thread. Consequently, methods that respond to system callbacks (such as onKeyDown() to report user actions or a lifecycle callback method) always run in the UI thread of the process.应用的每个组件都运行在主线程中。For instance, when the user touches a button on the screen, your app’s UI thread dispatches the touch event to the widget, which in turn sets its pressed state and posts an invalidate request to the event queue. The UI thread dequeues the request and notifies the widget that it should redraw itself.
When your app performs intensive work in response to user interaction, this single thread model can yield poor performance unless you implement your application properly. Specifically, if everything is happening in the UI thread, performing long operations such as network access or database queries will block the whole UI. When the thread is blocked, no events can be dispatched, including drawing events.当UI线程被耗时操作阻塞时,事件不会得到分发,包括重绘事件。 From the user’s perspective, the application appears to hang.从用户角度看,界面好像卡住了。 Even worse, if the UI thread is blocked for more than a few seconds (about 5 seconds currently) the user is presented with the infamous “application not responding” (ANR) dialog.如果UI线程被阻塞超过了5s,将会弹给用户一个ANR对话框。 The user might then decide to quit your application and uninstall it if they are unhappy.
Additionally, the Andoid UI toolkit is not thread-safe. So, you must not manipulate your UI from a worker thread—you must do all manipulation to your user interface from the UI thread.必须在UI线程中操作用户界面。 Thus, there are simply two rules to Android’s single thread model:Do not block the UI thread,Do not access the Android UI toolkit from outside the UI thread.不要阻塞UI线程,不要在UI线程之外操作UI。
Android offers several ways to access the UI thread from other threads. Here is a list of methods that can help:Android系统提供了几种方式来供其他线程来操作UI线程。
Activity.runOnUiThread(Runnable)View.post(Runnable)View.postDelayed(Runnable, long)
1 2 3 4 5 6 7 8 9 10 11 12 | |
To handle more complex interactions with a worker thread, you might consider using a Handler in your worker thread, to process messages delivered from the UI thread. Perhaps the best solution, though, is to extend the AsyncTask class, which simplifies the execution of worker thread tasks that need to interact with the UI.
AsyncTask allows you to perform asynchronous work on your user interface. It performs the blocking operations in a worker thread and then publishes the results on the UI thread, without requiring you to handle threads and/or handlers yourself.To use it, you must subclass AsyncTask and implement the doInBackground() callback method, which runs in a pool of background threads. To update your UI, you should implement onPostExecute(), which delivers the result from doInBackground() and runs in the UI thread, so you can safely update your UI. You can then run the task by calling execute() from the UI thread.
1 2 3 4 5 6 7 8 9 10 11 12 13 14 15 16 17 | |
Here is a quick overview of how AsyncTask works:
- You can specify the type of the parameters, the progress values, and the final value of the task, using generics
- The method
doInBackground()executes automatically on a worker thread onPreExecute(),onPostExecute(), andonProgressUpdate()are all invoked on the UI thread- The value returned by
doInBackground()is sent toonPostExecute() - You can call
publishProgress()at anytime indoInBackground()to executeonProgressUpdate()on the UI thread - You can cancel the task at any time, from any thread
Permissions
A central design point of the Android security architecture is that no application, by default, has permission to perform any operations that would adversely impact other applications, the operating system, or the user. This includes reading or writing the user’s private data (such as contacts or e-mails), reading or writing another application’s files, performing network access, keeping the device awake, etc.Android安全架构设计思想是默认没有应用有权限来做对其他应用程序,对系统或者其他用户有影响的操作。
All Android applications (.apk files) must be signed with a certificate whose private key is held by their developer.
At install time, Android gives each package a distinct Linux user ID. Because security enforcement happens at the process level, the code of any two packages can not normally run in the same process, since they need to run as different Linux users. You can use the sharedUserId attribute in the AndroidManifest.xml’s manifest tag of each package to have them assigned the same user ID. By doing this, for purposes of security the two packages are then treated as being the same application, with the same user ID and file permissions. Note that in order to retain security, only two applications signed with the same signature (and requesting the same sharedUserId) will be given the same user ID.
A basic Android application has no permissions associated with it by default, meaning it can not do anything that would adversely impact the user experience or any data on the device. To make use of protected features of the device, you must include in your AndroidManifest.xml one or more <uses-permission> tags declaring the permissions that your application needs.默认情况下APP不具有任何权限,如果想要获取设备上的数据或其他必须在安装APP时声明这些权限.
The permissions provided by the Android system can be found at Manifest.permission. Any application may also define and enforce its own permissions, so this is not a comprehensive list of all possible permissions.Android系统提供的权限可以在Manifest.permission中找到,APP也可以自己定义自己的权限.
A particular permission may be enforced at a number of places during your program’s operation:
- At the time of a call into the system, to prevent an application from executing certain functions.
- When starting an activity, to prevent applications from launching activities of other applications.
- Both sending and receiving broadcasts, to control who can receive your broadcast or who can send a broadcast to you.
- When accessing and operating on a content provider.
- Binding to or starting a service.
Android makes the decision as to whether an app might need the permission based on the value provided for the targetSdkVersion attribute. If the value is lower than the version in which the permission was added, then Android adds the permission.For example, the WRITE_EXTERNAL_STORAGE permission was added in API level 4 to restrict access to the shared storage space. If your targetSdkVersion is 3 or lower, this permission is added to your app on newer versions of Android.
1 2 3 4 5 6 7 8 9 | |
adb shell pm list permissions,adb shell pm list permissions -s
Activity permissions (applied to the <activity> tag) restrict who can start the associated activity. The permission is checked during Context.startActivity() and Activity.startActivityForResult(); if the caller does not have the required permission then SecurityException is thrown from the call.
Service permissions (applied to the <service> tag) restrict who can start or bind to the associated service. The permission is checked during Context.startService(), Context.stopService() and Context.bindService(); if the caller does not have the required permission then SecurityException is thrown from the call.
BroadcastReceiver permissions (applied to the <receiver> tag) restrict who can send broadcasts to the associated receiver. The permission is checked after Context.sendBroadcast() returns, as the system tries to deliver the submitted broadcast to the given receiver. As a result, a permission failure will not result in an exception being thrown back to the caller; it will just not deliver the intent. In the same way, a permission can be supplied to Context.registerReceiver() to control who can broadcast to a programmatically registered receiver. Going the other way, a permission can be supplied when calling Context.sendBroadcast() to restrict which BroadcastReceiver objects are allowed to receive the broadcast (see below).
ContentProvider permissions (applied to the <provider> tag) restrict who can access the data in a ContentProvider. (Content providers have an important additional security facility available to them called URI permissions which is described later.) Unlike the other components, there are two separate permission attributes you can set: android:readPermission restricts who can read from the provider, and android:writePermission restricts who can write to it. Note that if a provider is protected with both a read and write permission, holding only the write permission does not mean you can read from a provider. The permissions are checked when you first retrieve a provider (if you don’t have either permission, a SecurityException will be thrown), and as you perform operations on the provider. Using ContentResolver.query() requires holding the read permission; using ContentResolver.insert(), ContentResolver.update(), ContentResolver.delete() requires the write permission. In all of these cases, not holding the required permission results in a SecurityException being thrown from the call.
Note that both a receiver and a broadcaster can require a permission. When this happens, both permission checks must pass for the Intent to be delivered to the associated target.
The standard permission system described so far is often not sufficient when used with content providers. A content provider may want to protect itself with read and write permissions, while its direct clients also need to hand specific URIs to other applications for them to operate on. A typical example is attachments in a mail application. Access to the mail should be protected by permissions, since this is sensitive user data. However, if a URI to an image attachment is given to an image viewer, that image viewer will not have permission to open the attachment since it has no reason to hold a permission to access all e-mail.
The solution to this problem is per-URI permissions: when starting an activity or returning a result to an activity, the caller can set Intent.FLAG_GRANT_READ_URI_PERMISSION and/or Intent.FLAG_GRANT_WRITE_URI_PERMISSION. This grants the receiving activity permission access the specific data URI in the Intent, regardless of whether it has any permission to access data in the content provider corresponding to the Intent.
The granting of fine-grained URI permissions does, however, require some cooperation with the content provider holding those URIs. It is strongly recommended that content providers implement this facility, and declare that they support it through the android:grantUriPermissions attribute or <grant-uri-permissions> tag.