At this year’s Google I/O, Google released a preview to the upcoming Android version. The so called L Developer Preview. This is a very big improvement over previous releases and I really love that Google is doing this. I think we all benefit by this decision. As developers and as consumers alike!
Part of this preview are two new views: RecyclerView and CardView. This post gives you an introduction to the RecyclerView, it’s many internal classes and interfaces, how they interact and how you can use them.
Let me start with the good news : RecyclerView is part of the support library. So you can use it right now. Ok: You can use it as soon as the final support lib accompanying the L release gets released. So better to familiarize yourself with it right away.
Sample project
The screenshots and the video at the end of the post show the sample project for this post in action. You can find the source of this sample at github. Keep in mind that the RecyclerView API is not yet finalized. Google might still change things that could break the sample when they release the final version of Android L.
What’s with this odd name? Why RecyclerView?
This is how Google describes RecyclerView in the API documentation of the L preview release:
A flexible view for providing a limited window into a large data set.
So RecyclerView is the appropriate view to use when you have multiple items of the same type and it’s very likely that your user’s device cannot present all of those items at once. Possible examples are contacts, customers, audio files and so on. The user has to scroll up and down to see more items and that’s when the recycling and reuse comes into play. As soon as a user scrolls a currently visible item out of view, this item’s view can be recycled and reused whenever a new item comes into view.
The following screenshots of the sample app illustrate this. On the left is the sample app after the initial start. When you scroll the view up, some views become eligible for recycling. The red area on the right screenshot, for example, highlights two invisible views. The recycler can now put these views into a list of candidates to be reused should a new view be necessary.
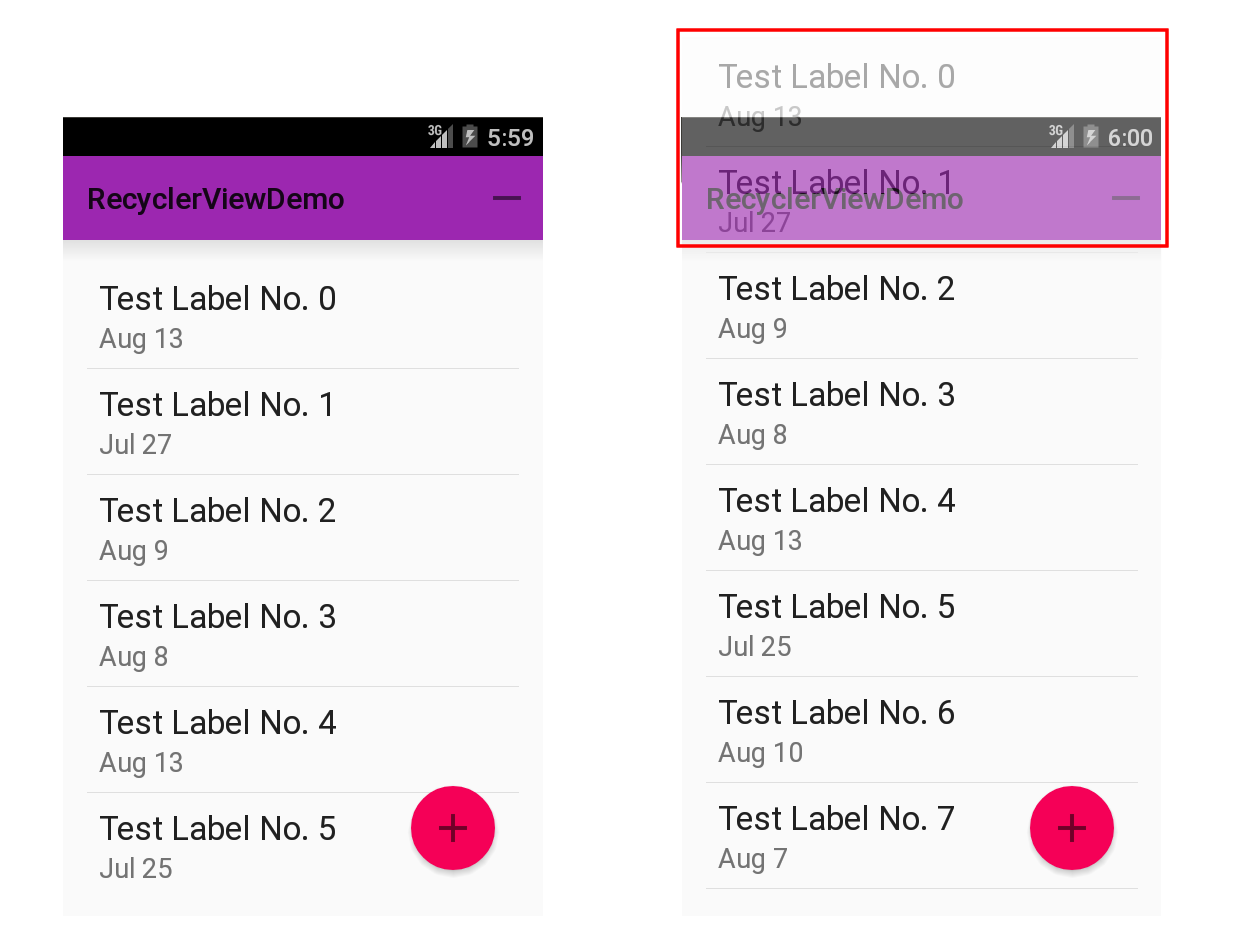
Recycling of views is a very useful approach. It saves CPU resources in that you do not have to inflate new views all the time and it saves memory in that it doesn’t keep plenty of invisible views around.
Now, you might say: That’s nothing new. And you’re right! We had that with ListView for a very long time. The concept of recycling views itself it not new. But while you previously had a ListView where the appearance, recycling and everything was tightly coupled, Google now follows a much better, a much more flexible approach with the new RecyclerView. I really like the approach Google has taken here!
RecyclerView doesn’t care about visuals
Here’s the thing: While with Listview we had tight coupling, Google now uses an approach where the RecyclerView itself doesn’t care about visuals at all. It doesn’t care about placing the elements at the right place, it doesn’t care about separating any items and not about the look of each individual item either. To exaggerate a bit: All RecyclerView does, is recycle stuff. Hence the name.
Anything that has to do with layout, drawing and so on, that is anything that has to do with how your data set is presented, is delegated to pluggable classes. That makes the new RecyclerView API extremely flexible. You want another layout? Plug in another LayoutManager. You want different animations? Plug in an ItemAnimator. And so on.
Here’s the list of the most important classes that RecyclerView makes use of to present the data. All these classes are inner classes of the RecyclerView:
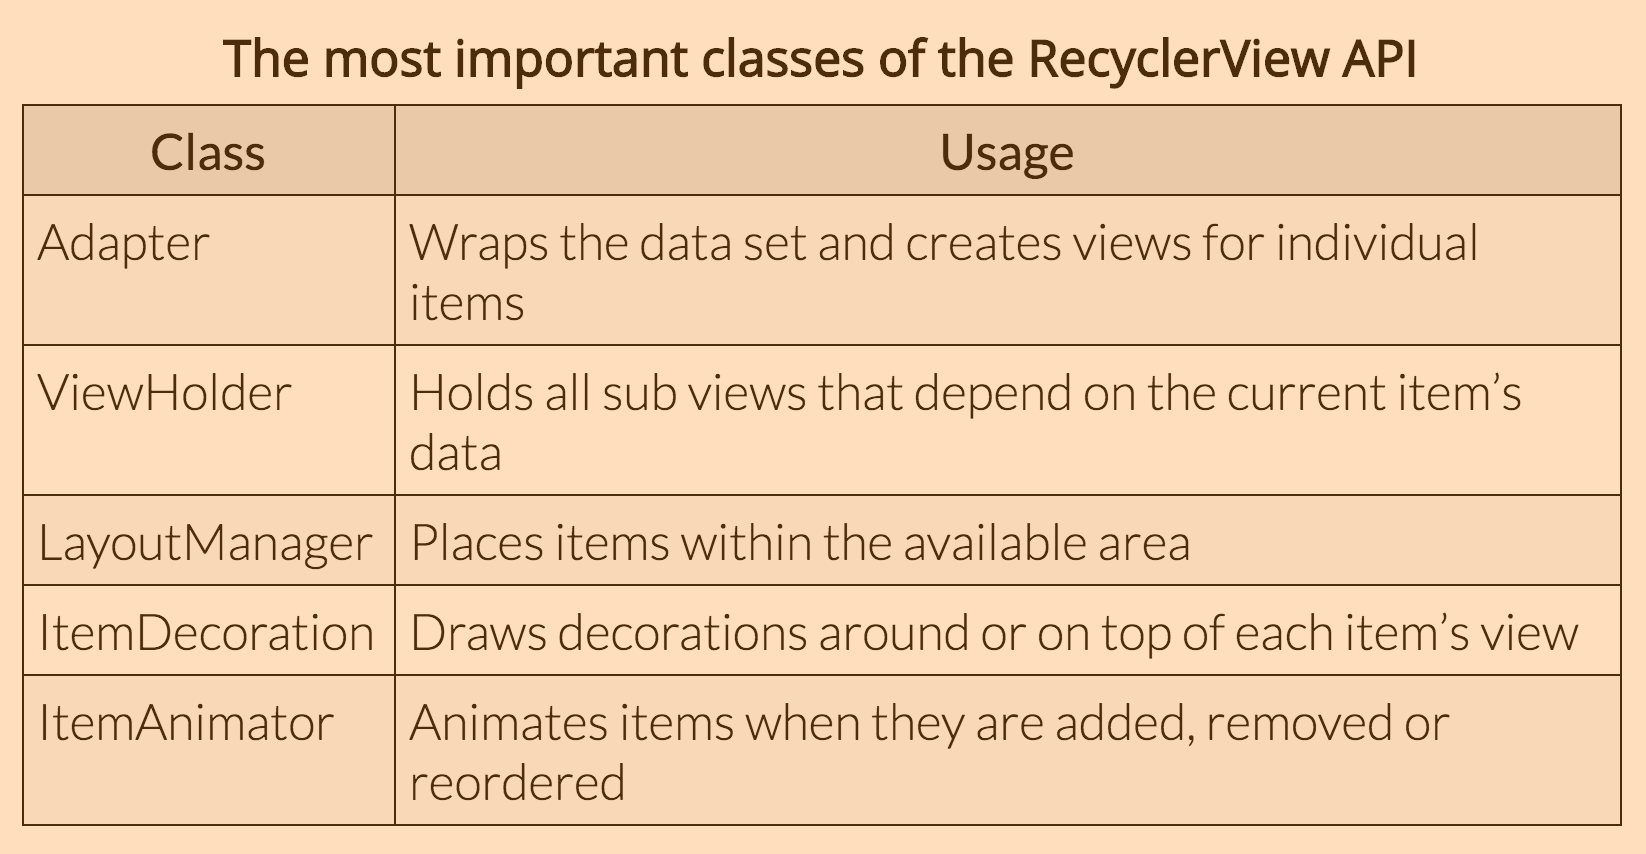
In the next paragraphs I will briefly describe what each class or interface is about and how RecyclerView uses it. In future posts I will revisit some of these classes, write about them in detail and show you how to customize them for your project’s needs.
ViewHolder
ViewHolders are basically caches of your View objects. The Android team has been recommending using the ViewHolder pattern for a very long time, but they never actually enforced the use of it. Now with the new Adapter you finally have to use this pattern.
It’s a bit weird that Google waited so long to enforce the usage of the ViewHolder pattern, but better late than never. If you do not know about the ViewHolder pattern, have a look at this Android training session. It uses the old Adapter, but the pattern itself hasn’t changed.
Also searching for ViewHolder should yield plenty of hits to further blog posts. For example this post by Antoine Merle about ListView optimizations.
One thing that is specific to any RecyclerView.ViewHolder subclass is that you can always access the root view of your ViewHolder by accessing the public member itemView. So there’s no need to store that within your ViewHolder subclass.
And should you decide to override toString() have a look at the base class. Its toString() implementation prints some useful information you should consider to use for your log messages as well.
Here’s the code for the ViewHolder of the sample project. The ViewHolder is an inner class of the sample project’s Adapter:
1 2 3 4 5 6 7 8 9 10 | |
RecyclerView.Adapter
Adapters fulfill two roles: They provide access to the underlying data set and they are responsible for creating the correct layout for individual items. Adapters always were part of Android and were used in many places. ListView, AutoCompleteTextView, Spinner and more all made use of adapters. All those classes inherit from AdapterView. But not so RecyclerView.
For the new RecyclerView Google has decided to replace the old Adapter interface with a new RecyclerView.Adapter base class. So say good bye to things like SimpleCursorAdapter, ArrayAdapter and the like. At least in their current incarnation.
Currently there is no default implementation of RecyclerView.Adapter available. Google might add some later on, but I wouldn’t bet on this. For Animations to work properly, cursors and arrays aren’t the best fit, so porting the current Adapter implementations might not make too much sense.
Since RecyclerView.Adapter is abstract you will have to implement these three methods:
public VH onCreateViewHolder(ViewGroup parent, int viewType)public void onBindViewHolder(VH holder, int position)public int getItemCount()
The VH in the method signatures above is the generic type parameter. You specify the concrete type to use when you subclass the RecyclerView.Adapter. You can see this in line 3 of the next code sample.
The most basic adapter for the sample layout looks like this:
1 2 3 4 5 6 7 8 9 10 11 12 13 14 15 16 17 18 19 20 21 22 23 24 25 26 27 28 29 30 31 32 33 34 35 36 37 38 39 40 41 42 43 44 45 46 47 | |
RecyclerView.LayoutManager
The LayoutManager is probably the most interesting part of the RecyclerView. This class is responsible for the layout of all child views. There is one default implementation available: LinearLayoutManager which you can use for vertical as well as horizontal lists.
You have to set a LayoutManager for your RecyclerView otherwise you will see an exception at Runtime:
1 2 | |
Only one method of LayoutManager is currently abstract:
public LayoutParams generateDefaultLayoutParams()
But there is another one where the code states that you should overrride it since it’s soon going to be abstract:
1 2 3 4 5 | |
That’s very weird! Why not make it abstract right away? Anyway: Better you override this one to be on the safe side for when Google releases the final version of L.
But only overriding those two methods won’t get you very far. After all the LayoutManager is responsible for positioning the items you want to display. Thus you have to override onLayoutChildren() as well.
This method also contains a log statement stating “You must override onLayoutChildren(Recycler recycler, State state)”. Ok, then make it abstract :–) Luckily there’s still plenty (?) of time to change that into a proper abstract method for the final release of L. We all make mistakes. After all, my “Stupid stuff devs make” series is all about blunders that I made. So don’t get me wrong. No hard feelings here!
LinearlayoutManager
The LinearLayoutManager is currently the only default implementation of LayoutManager. You can use this class to create either vertical or horizontal lists.
The implementation of LinearLayoutManager is rather complex and I only had a look at some key aspects. I will return to this implementation in my post about custom LayoutManagers.
To use the LinearLayoutManager you simply have to instantiate it, tell it which orientation to use and you are done:
1 2 3 4 | |
LinearLayoutManager also offers some methods to find out about the first and last items currently on screen:
findFirstVisibleItemPosition()findFirstCompletelyVisibleItemPosition()findLastVisibleItemPosition()findLastCompletelyVisibleItemPosition()
Surprisingly these methods are not part of the source code in the SDK folder, but you can use them as they are part of the binaries. As I cannot imagine those being removed, I’m sure you’ll find these in the final L release as well.
Other methods help you get the orientation of the layout or the current scroll state. Others will compute the scroll offset. And finally you can reverse the ordering of the items.
Since I’m going to write an extra post about LayoutManagers this should suffice for now.
RecyclerView.ItemDecoration
With an ItemDecoration you can add an offset to each item and modify the item so that items are separated from each other, highlighted or, well, decorated.
You do not have to use an ItemDecoration. If, for example, you use a CardView for each item, there’s no need for an ItemDecoration.
On the other hand you can add as many ItemDecorations as you like. The RecyclerView simply iterates over all ItemDecorations and calls the respective drawing methods for each of them in the order of the decoration chain.
The abstract base class contains these three methods:
public void onDraw(Canvas c, RecyclerView parent)public void onDrawOver(Canvas c, RecyclerView parent)public void getItemOffsets(Rect outRect, int itemPosition, RecyclerView parent)
Anything you paint in onDraw() might be hidden by the content of the item views but anything that you paint in onDrawOver() is drawn on top of the items. If you simply create a bigger offset and, for example, use this offset to paint dividers, this of course is of no importance. But if you really want to add decorations, you have to use onDrawOver().
The LayoutManager calls the getItemOffset() method during the measurement phase to calculate the correct size of each item’s views. The outRect parameter might look a bit odd at first. Why not use a return value instead? But it really makes a lot of sense, since this allows RecyclerView to reuse one Rect object for all children and thus save resources. Not necessarily nice — but efficient.
One thing I didn’t expect considering the name of the class is that the onDraw()/onDrawOver() methods are not called for each item, but just once for every draw operation of the RecyclerView. You have to iterate over all child views of the RecyclerView yourself.
I will explain this in more detail in a follow-up post about writing your own ItemDecorations.
RecyclerView.ItemAnimator
The ItemAnimator class helps the RecyclerView with animating individual items. ItemAnimators deal with three events:
- An item gets added to the data set
- An item gets removed from the data set
- An item moves as a result of one or more of the previous two operations
Luckily there exists a default implementation aptly named DefaultItemAnimator. If you do not set a custom ItemAnimator, RecyclerView uses an instance of DefaultItemAnimator.
Obviously for animations to work, Android needs to know about changes to the dataset. For this Android needs the support of your adapter. In earlier versions of Android you would call notifyDataSetChanged() whenever changes occured, this is no longer appropriate. This method triggers a complete redraw of all (visible) children at once without any animation. To see animations you have to use more specific methods.
The RecyclerView.Adapter class contains plenty of notifyXyz() methods. The two most specific are:
public final void notifyItemInserted(int position)public final void notifyItemRemoved(int position)
The following video shows the result of an addition as well as a removal of an item in the sample app:
Listeners
RecyclerView also offers some rather generic listeners. Once again you can safely forget everything you used to use up to now. There is no OnItemClickListener or OnItemLongClickListener. But you can use an RecyclerView.OnItemTouchListener in combination with gesture detection to identify those events. A bit more work and more code to achieve the same result. I still hope for Google to add those Listeners in the final release. But whether those Listeners will be added is as an open question.
Combining all classes
You combine the classes either in a fragment or an activity. For the sake of simplicity my sample app uses activities only.
First of all here’s the layout file containing the RecyclerView:
1 2 3 4 5 6 7 8 9 10 11 12 13 14 15 16 17 18 19 20 21 22 23 24 25 26 27 28 29 30 31 32 33 | |
As you can see, nothing special here. You do not define the orientation or stuff like that on the RecyclerView. Actually RecyclerView itself makes no use of the attributes, it passes them on to the parent (which is ViewGroup) and that’s it.
There is one place within RecyclerView where an AttributeSet is used and that is in the generateLayoutParams() method:
1 2 3 4 5 6 7 | |
In this snippet the RecyclerView passes the AttributeSet on to the LayoutManager.
The Java code is also pretty simple:
1 2 3 4 5 6 7 8 9 10 11 12 13 14 15 16 17 18 19 20 21 22 23 24 25 26 27 28 29 30 31 | |
Connecting all those elements together roughly consists of these steps:
- Get a reference to your RecyclerView
- Create a LayoutManager and add it
- Create an Adapter and add it
- Create zero or more ItemDecorations as needed and add them
- Create an ItemAnimator if needed and add it
- Create zero or more listeners as needed and add them
All in all about 30 lines of code.
Now of course this is misleading. That’s only the glue code. The really interesting stuff is in RecyclerView’s many inner classes which you can subclass and tweak to your needs. That’s where the real work is done.
But the separation of concerns Google created helps you stick to one task within one implementation and it should make reuse easier to achieve. That’s why I like RecyclerView and its ecosystem. I’m not afraid to criticize big G, but that’s well done, Google!
Gradle integration
To use RecyclerView you have to add it to your gradle file. Adding the support library alone is not enough:
1 2 3 4 5 | |
Is that the final API?
Of course I do not know if the concrete implementations that the preview contains will be in the final release of Android L. But I guess so. And I expect some additions as well as minor changes to the API, based on bug reports and developer feedback.
Google itself gives one hint in the current API documentation about more stuff to come. The documentation for the RecyclerView.LayoutManager class contains this nugget:
Several stock layout managers are provided for general use.
So we can expect more LayoutManagers. Which, of course, is good. Furthermore I expect at least one default ItemDecoration as well. After all the support library’s sample project contains a DividerItemDecoration, which works well with the LinearLayoutManager.
I’m more skeptical about adapters. While an ArrayAdapter (or better yet, ListAdapter) is very well possible, I am more doubtful about a CursorAdapter since cursors do not lend themself easily to the new addition and removal notifications within the Adapter.